

TuneCable Apple Music Converter
If you're already invested in the Apple ecosystem and own an iPhone, iPad, or Mac, then using Apple Music might be more convenient for you as it's integrated into Apple's operating systems. Apple Music boasts a massive music library with over 75 million songs. This means that you can find just about any song or album you're looking for. Besides, Apple Music offers exclusive content, such as live performances and interviews.
Although for Apple Music users, the Apple Music music library is already very comprehensive. But some users also use other streaming music services at the same time or use software to create some songs themselves. Is there a good way to import these songs downloaded from other streaming music platforms, as well as some local audio files, to Apple Music? This has been puzzling some users. Because it seems simple, but we need to adopt different strategies to deal with it according to the actual situation. In this article, we list several cases in detail about how to import local audio files to Apple Music, and how to import Spotify, Tidal, and Amazon music to Apple Music. Let's take a few minutes to understand this well-planned scheme.
First, let's check what format Apple Music supports to avoid file import failure.
Apple Music Supported Audio File Formats: AAC (8 to 320 Kbps), Protected AAC (from iTunes Store), HE-AAC, MP3 (8 to 320 Kbps), MP3 VBR, Audible (formats 2, 3, 4, Audible Enhanced Audio, AAX, and AAX+), Apple Lossless(ALAC), AIFF and WAV
AAC, MP3, ALAC, AIFF, and WAV are commonly used among those formats. If the song format you plan to import to Apple Music is not compatible, you can refer to this section to convert the song format and then import. But if the songs you need to import are from streaming music platforms, such as Spotify, Amazon, or Tidal, then these songs are protected in an encrypted format. You need to slide down to the next section to learn how to import songs from other streaming music apps to Apple Music.
Let's check how to add local songs to Apple Music on different devices. You can directly jump to the part you prefer.
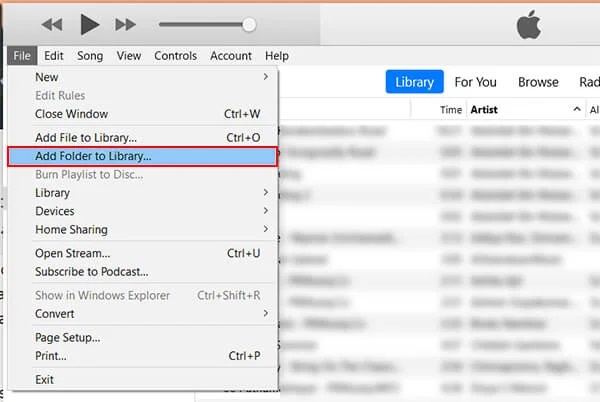
Step 1: On a Windows PC, open the iTunes app. (The iTunes app has been replaced by the Apple Music app recently in some regions. Then you can follow part 2.2)
Step 2: In the top-left corner, navigate to "File > Add File/Folder to Library".
Step 3: Instantly, a pop-up explorer window appears. You are allowed to select songs from the local disk and import them.
Step 1: On Mac, open the Music app. Then go to "File > Add To Library or File > Import". (If you selected "Copy files to Music Media folder when adding to library" in "Files" settings, you see "File > Import".)
Step 2: Locate where the local songs are stored and click on "Open" to import. If you choose to add a folder, then all the files it contains are added to your library.
When running on a Windows PC, through the iTunes app we can upload local songs to Apple Music on iPhone or iPad. Here are the detailed steps you can refer to:
Step 1: On your computer, open the iTunes app. Then get an exclusive USB cable to establish a connection between your iPhone/iPad and computer.
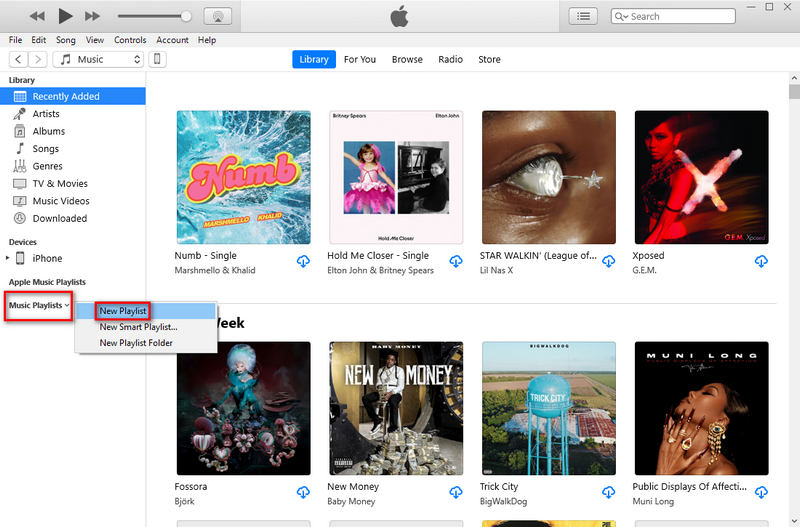
Step 2: To locate the imported songs quickly, we'd better create a new playlist to store these files. On the left panel of iTunes, go to the "Music Playlist" tab and right-click "hide". Then you can choose to create a new playlist.
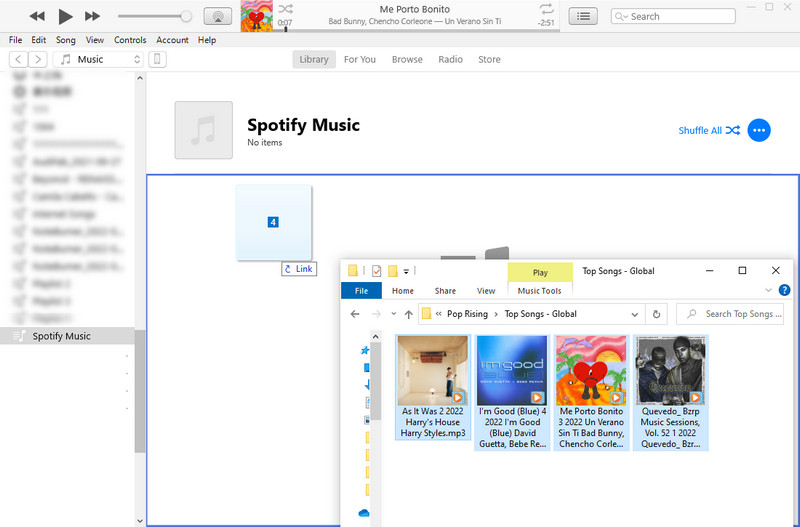
Step 3: Open the file folder where the local songs are stored, then drag them to the new playlist.
Step 4: Then in the upper left, click on the "device icon" ![]() .
.
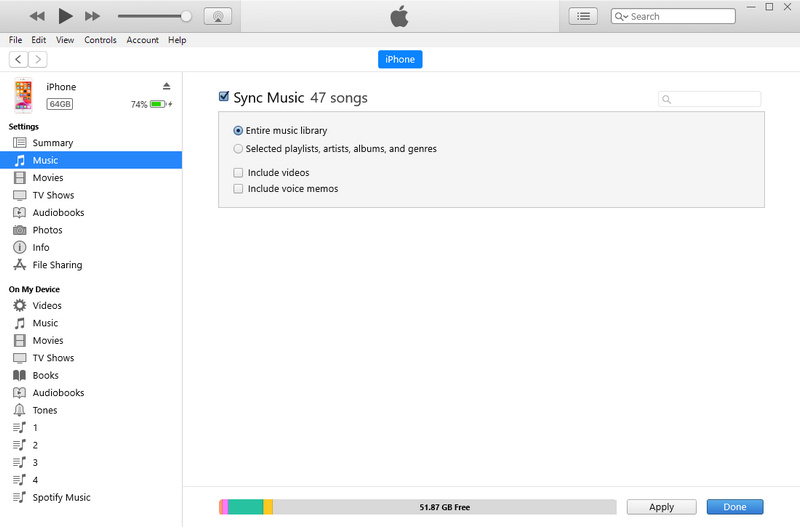
Step 5: Scroll down to the "Settings" column and click on the "Music" tab. Select the "Sync Music" option and tick off "Entire Music Library".
Step 6: Look down at the "Sync" button, and click on it. It will activate the syncing process. After a while, all Music playlists, including the newly created playlist will be uploaded to your iPhone.
Step 7: Open the Apple Music app on your iPhone, then you can find the newly imported songs. Now, you can play them without a network connection.
Note: You'd better make a full backup of your Apple Music playlists in advance to avoid any loss. Because when choosing only sync the Selected playlists, artists, albums, and genres, other existing playlists on your iPhone will be removed. If you're afraid of overwriting, you should follow part 1.5.
For those who own a Mac, how do they transfer songs from a Mac to Apple Music for iPhone/iPad? The following instructions will be helpful.
Step 1: On your Mac, start the Music app. Then get a USB cable to connect your iPhone or iPad to the Mac.
Step 2: On the left panel, go to the "Playlist" tab. Right-click it to add a new playlist for storing the songs you are about to import.
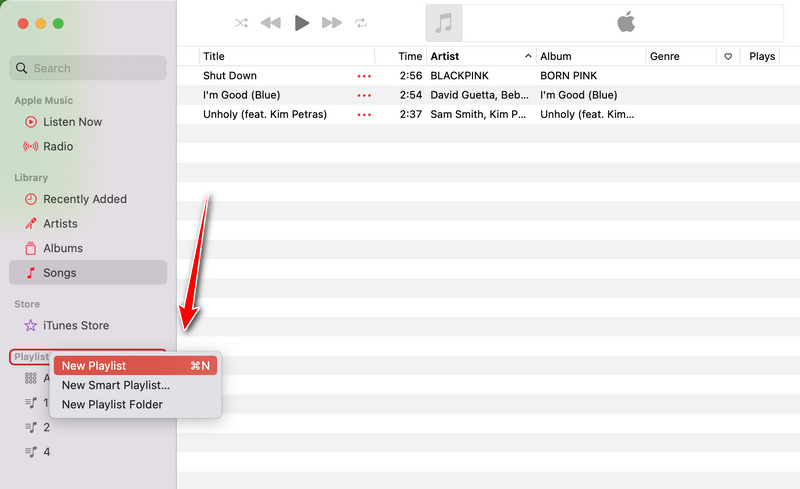
Step 3: Now, we need to import the songs first. Under the "Library" section, choose "Songs". Drag and drop songs from the local Mac to the Apple Music library.
Step 4: Afterward, right-click the newly added songs and add them to the playlist you've just created.
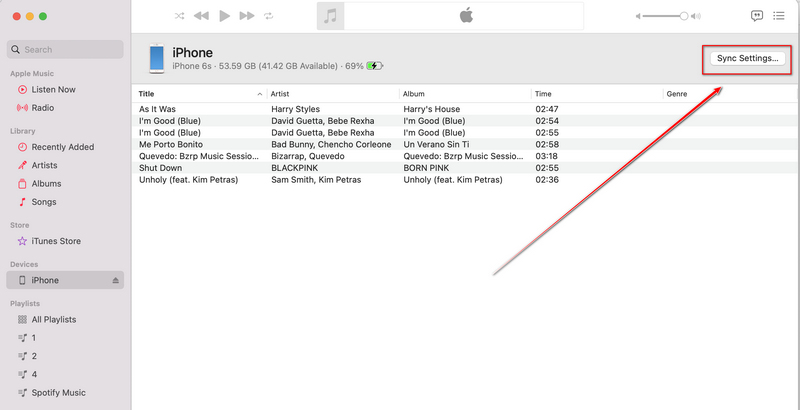
Step 5: Next, we are going to upload the songs to the connected iOS device. Under the "Device" section, tap on the device name, such as "iPhone". Then go to the "Sync Settings" option in the top-right corner.
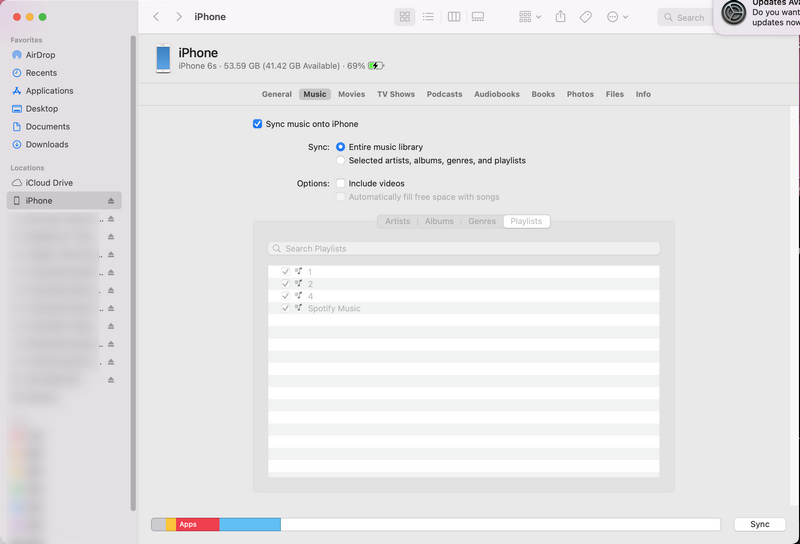
Step 6: Choose the "Music" tab and then tick off "Entire Music Library". To update the Apple Music playlist on the connected iOS device, just click on "Apply". Soon after, you can see the newly added songs via the Apple Music app on your iOS device.
Note: When only selecting the Selected playlists, artists, albums, and genres option, other playlists on your iPhone will be removed. You'd better make a full backup of the Apple playlist or try the solution in part 1.5.
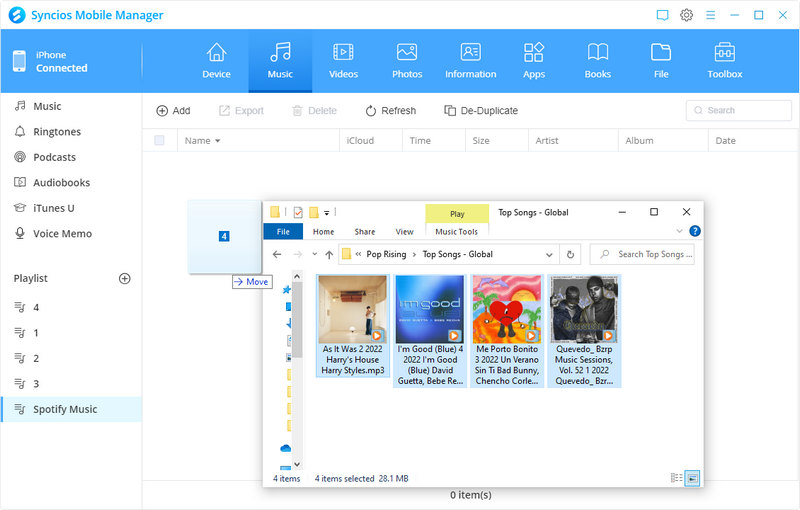
Years ago, I installed Syncios Mobile Manager and kept it all the time. I want to share this tool because it's free to transfer media files between iOS/Android and Windows PC/Mac. It works great for backing up data of devices and importing data to devices. Most importantly, it will never overwrite any existing data. When uploading songs to my iPhone, I can't help worrying about data overwriting by using iTunes. Besides, it can export and import media files like audio, music, videos, and photos without upgrading to a paid account for Syncios. Let's check how it works.
Step 1: Get this Syncios Mobile Manager installed on your Windows PC or Mac. Then connect your iOS device to the computer.
Step 2: Start the Syncios program and go to "Mobile Manager" on the primary interface.
Step 3: Go to the "Music" column where you can view all audio files and playlists on the connected iPhone, iPad, or iPod touch.
Step 4: Go to the "Playlists" tab to create a new playlist for adding local songs.
Step 5: Drag and drop the local song from your local PC to the playlist. Once it's done, you can disconnect your iOS device. Then open the Apple Music app on your iPhone or iPad, and the songs will be displayed on the Music app. You can offline play them anytime.
Compared with transferring local songs to Apple Music, more people will look forward to how to transfer songs from other streaming music platforms to Apple Music. Because we all know that major streaming music services provide massive music libraries, which can basically meet all our needs.
However, there is a drawback that the major streaming media platforms cannot interoperate. Songs you download from other sources cannot be played by other music software. Because all songs from streaming media software are encrypted and protected. But every once in a while, there are always users thinking about switching from one platform to another. Especially for users who just bought a new iPhone, iPad, or iPod, there is a high probability that they will give up the streaming media service they subscribed to before and then turn to Apple Music. Because on Apple products, using Apple Music, the official player designated by Apple, will save you a lot of trouble.
We divide this part into three subsections. Next, let us take you to unveil it step by step.
The monthly payment to the streaming music service, like Spotify, Amazon Music, Apple Music, and Tidal Music, will not endow you with unlimited use of music. The only right is to access their music library with more tracks and unlock offline listening. To dump the restraints imposed on the music tracks, some music downloaders are reliable and effective.
A group of professional technicians with innovative ideas founded the brand TuneCable and launched a series of music downloaders. The main purpose of these music downloaders is to remove restrictions on the use of songs, thereby facilitating the free use and permanent preservation of music.
🔹 TuneCable Spotify Music Converter: Download songs, albums, and playlists from Spotify to a local PC and convert them as popular formats without encryption retained. Spotify Free and Premium accounts are feasible to download songs offline via TuneCable Spotify Music Converter.
🔹 TuneCable Tidal Music Converter: Extract Tidal music in common formats at a fast speed and the master-quality music can be converted without losing the audio quality.
🔹 TuneCable Amazon Music Converter: Download HD or Ultra HD music and podcasts from Amazon Music in popular formats with the original quality preserved.
🔹 TuneCable Apple Music Converter: Not only download Apple Music to local files but also convert M4A/M4B/AA/AAX audiobooks, podcasts, and M4P music to MP3, AAC, WAV, FLAC, AIFF, and ALAC formats. It can be used as an all-in-one iTunes audio, Apple Music, and audiobook converter. We will nail down more specifics about this tool in part 3.
Key features of TuneCable Spotify/Tidal/Amazon/Apple Music Downloaders:
Step 1 Download and Install TuneCable Music Downloader
There are kinds of music downloaders on TuneCable. You need to get the one you need and install it from the Download Center. It takes similar steps to use Spotify, Tidal Music, and Amazon Music converters. In this part, we take TuneCable Spotify Music Downloader as an example to orient you on how it works.
Download and install TuneCable Spotify Downloader on your computer. Choose a Windows version or Mac version when downloading. Once it's installed, double-click the program to launch it.
TuneCable supports downloading music from the app or downloading music from the web player. If you opt for the former, the Spotify Music app will start. If you opt for the latter, the Spotify web player will pop up automatically.

Step 2 Add Songs/Albums/Playlists to Download
Download music from the app:
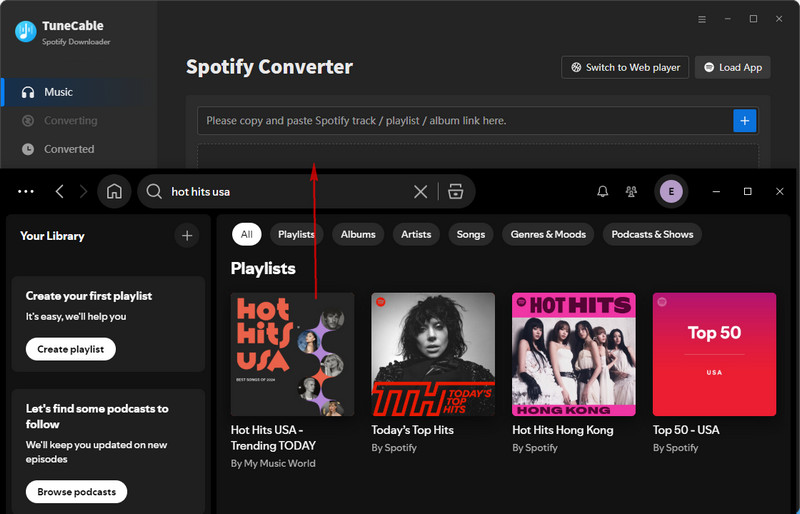
Go to any song, album, or playlist, then right-click on it. Go to "Share > Copy Song/Album/Playlist link" to copy the link and paste it into the parsing box of TuneCable. Or you can simply drag and drop a song, album, or playlist you want from the Spotify app to TuneCable for parsing.
Download music from the web player:
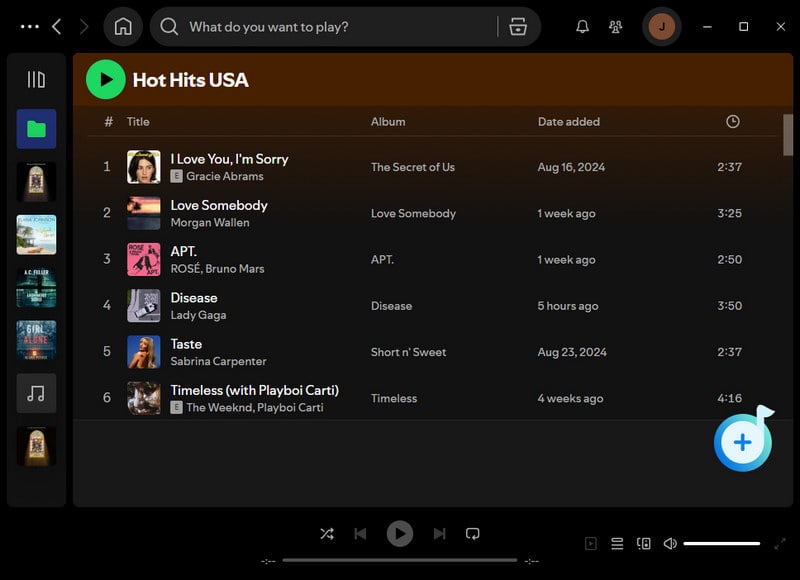
In the Spotify built-in web player, go to a song, album, playlist and enter its detailed page. hit the "Click to add" button in ther lower right to load songs.
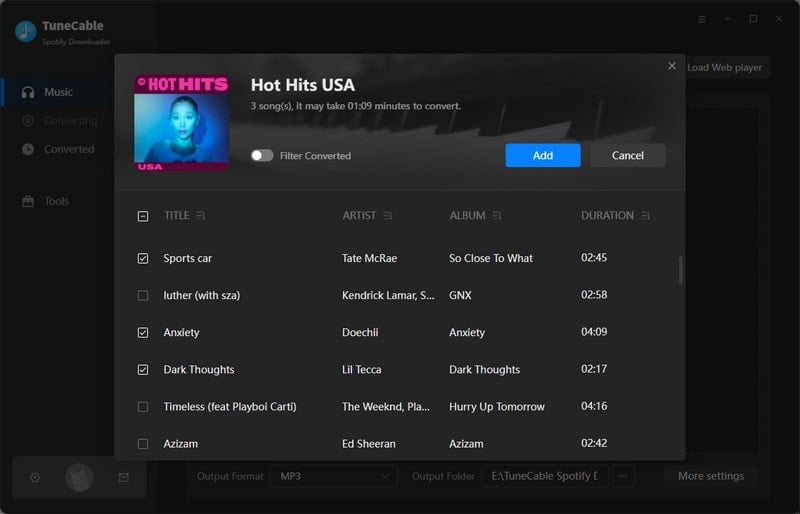
Once it loads available songs, select the wanted tracks and then click "Add" to put them into the download list.
Step 3 Customize the Output Settings before the Conversion
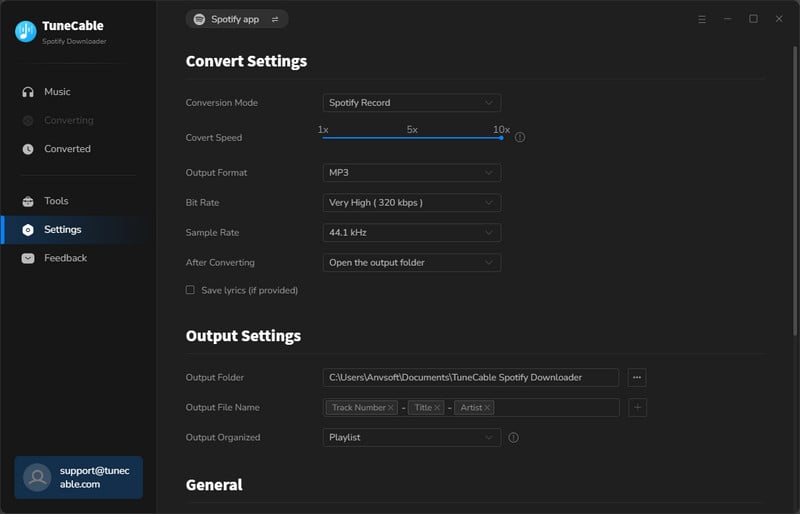
In the upper right, tap on the "Settings" button to unfold output parameters. Select the options according to your requirements. To download the songs with the best quality kept, you can set "Spotify Record" in the "Conversion Mode" setting. And then choose "Recommended" in the output format. The "Recommended" option is prepared for users who are willing to download songs in the original format and quality.
Note: Except for FLAC format, other formats are compatible with Apple Music. If you choose to download songs in FLAC formats, then you will fail to import them to Apple Music.
Convert Settings
Output Settings
Step 4 Converting Music to Local Songs
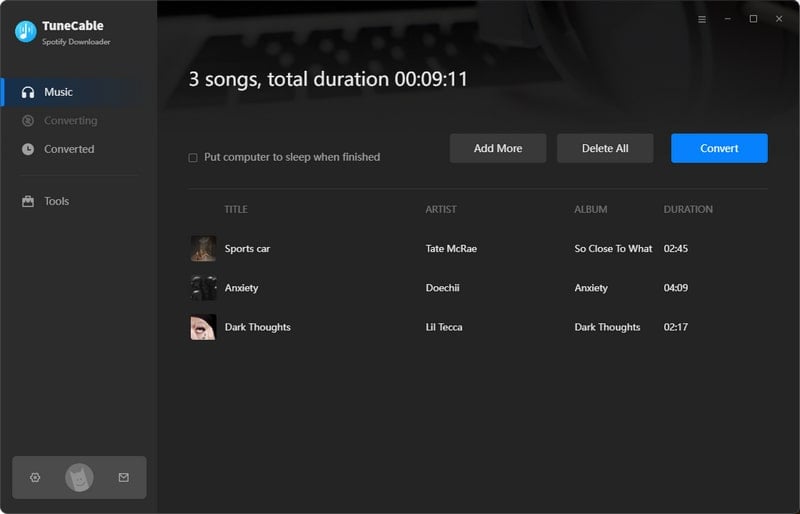
Go back to the "Home" section. To convert more songs at once, go to the upper right and click on the "Add More" button. If not, then you can start the conversion by hitting on the "Convert" button.
Step 5 Unlimited Playback of the Downloaded Music
After completing the conversion, the downloaded songs are saved in the output folder. The selected songs are stored in plain MP3 formats with the ID3 tags (artist, title, album, etc.) retained. Now, you can freely use them and transfer them at will.
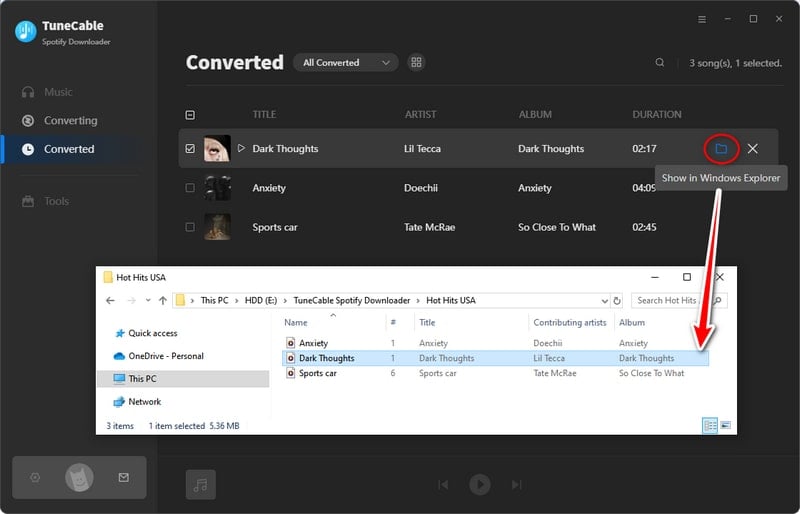
After following the steps above, we extracted the songs from Spotify, Tidal, or Amazon Music apps to the local PC and stored them as local songs. Now, you can refer to part 1 in this article to upload songs to Apple Music freely. Or you can use the tool that TuneCable provides to import the downloaded songs to iTunes directly.
More Tools on TuneCable Could be Useful
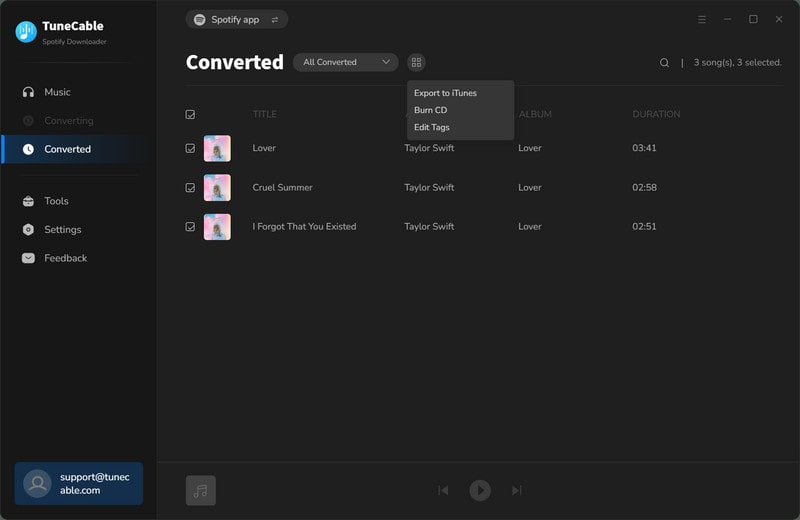
# Export to iTunes ⇢ Once the songs are converted, you can go to the "History" column on TuneCable to check the download history. Tick off the songs you need, click on the four-square icon above the tracks, and select "Export to iTunes". TuneCable assists you in uploading the downloaded songs to iTunes(on Win) or Apple Music(on Mac) directly.
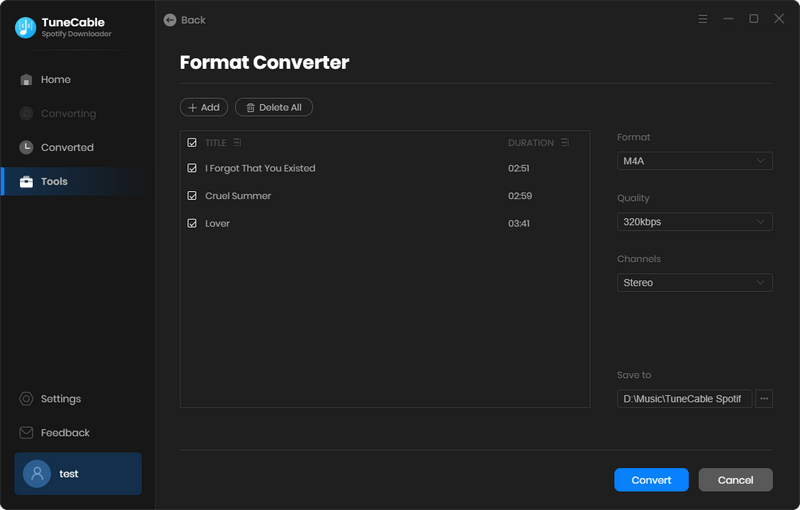
# Format Converter ⇢ Go to the "Tools" column on TuneCable, then choose "Format Converter". Add songs from your local PC, then you can convert the local songs to MP3, M4A, FLAC, WAV, AIFF, and OGG.
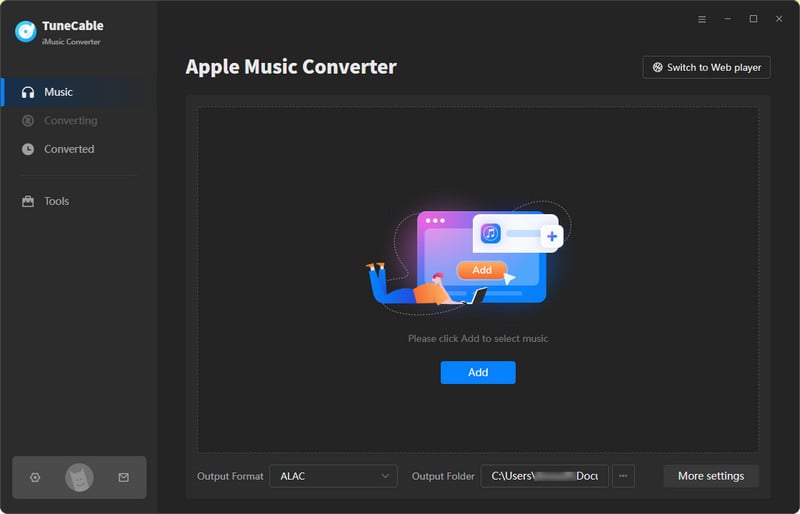
After subscribing to Apple Music, how to extend more possibility of Apple Music tracks, albums, playlists, and other audio files? TuneCable Apple Music Converter can be supportive. This tool has the super ability to convert encrypted music files to common MP3, AAC, WAV, FLAC, AIFF, and ALAC formats, including iTunes (M4A/M4B) downloaded songs, audible (AA/AAX) audiobooks, songs from Apple Music. Whenever you are planning to assign a conversion that facilitates decrypting Apple songs, albums, playlists, and podcasts in common formats with the full ID3 tags retained, TuneCable is the best partner.
Step 1: Start TuneCable Apple Music Converter, and then click on the "+Add" button.
Step 2: TuneCable will load iTunes downloads, audiobooks, and Apple Music playlists of yours.
Step 3: Tick off the wanted tracks and then click on "OK".
Step 4: Click the "Settings" button in the top right and set up the output parameters.
Step 5: Go back to the "Home" section. hit the "Convert" button to process the conversion at a faster speed.
This article covers almost all ways to transfer songs to Apple Music. I believe that you can also gain something from this comprehensive tutorial. If you want to transfer playlists from other streaming services to Apple Music, you can choose the suitable TuneCable music downloader for you on this page.
If you are planning to become an Apple Music subscriber, TuneCable Apple Music must be the best helper. It can help you download Apple songs locally and then achieve full control. If you find this post helpful, please share it with the people around you. Start a free trial of TuneCable and have fun now! Wish you good every day!
 What's next? Download TuneCable iMusic Converter now!