

TuneCable Spotify Downloader
 >
How To >
Have you ever wanted to make a romantic mixtape for your partner but didn't know how to burn music into your CD or burn Spotify music to CD? Or was it that you made the perfect travel playlist but it never made it to your mixtape because you weren't able to figure out how to find songs to put on your CD?
We all have been there. Even if you figure out how to burn songs, another major obstacle faced is the non-availability of songs. All streaming services encrypt their songs using specific extensions to prevent any copying. The CDs, too, just allow the burning of files with MP3, AAC (unprotected), and WAV extensions.
So what if you want to burn music files from the platforms like Spotify, Apple Music, or Amazon Music? In that case, you'll require professional tools to burn these files. But which tools should you trust your CD’s with? If you're wondering the same then you're at the right place. In this guide, we'll take you through the best tools to burn streaming music to CD, for an amazing streaming experience. By the end of reading this article, you’ll be able to burn Apple/Spotify/Amazon Music to CD without any problem.
Spotify is a one-stop streaming platform that offers songs and playlists that come in every language and suit every mood. It's a huge library of songs that you won't find on any other platform. It has podcasts that range from educational, fun to silly celebrity talks. Its versatility is so large that any individual from any part of the world could find their taste being reflected. But despite having so many good qualities, transferring files from Spotify to any CD can be a real hassle. Even after a premium subscription, the downloaded files cannot be played outside the Spotify app. The platform doesn't really allow the 'downloading' of files on the device itself which is tangible from the application or the website.
What you need in this situation is a Spotify Multifunctional Music downloader. TuneCable Spotify Downloader is one such downloader that allows an easy, hassle-free, and convenient way to download and convert files and burn Spotify music to CD. Through this application, you'll be able to save and download all your songs, playlist, radios, or podcasts over local folders with over 10x speed. It also offers you the choice to select the most suitable music conversion format that you wish to use - AAC/MP3/AIFF/FLAC/WAV/ALAC. Its functionality makes even the burning process easier - it burns the downloaded Spotify songs right into the CD. The downloaded songs will retain their high quality for the perfect listening experience! And it doesn't matter if you use Mac or Windows, both of these OS are compatible with the downloader. These downloaded files can then be further edited and made available across different devices.

To start the process you need to download the TuneCable Spotify Music Downloader on your device. This program will do the job of both convertor and burner for your files. So, you need not install any other software for the conversion. Once the software is downloaded follow the given steps to burn your CD with all your favorite tracks.
Step 1 : Open the TuneCable Spotify Music Downloader
After downloading the software, open it by double-clicking on its respective icon; this will automatically launch your Spotify app.

Step 2 : Customize your Conversion Parameters
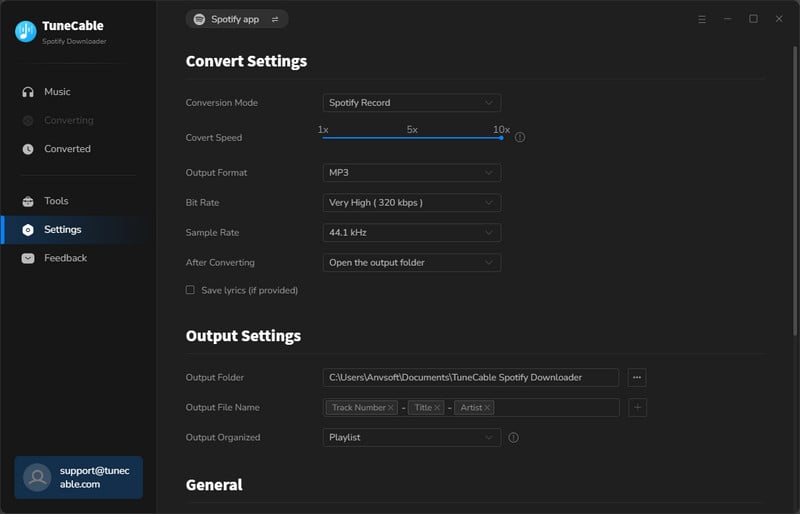
To set up the conversion parameters go to the settings tab present on the upper right corner. Then to directly apply the settings, simply close the tab.
Conversion Settings:
Output Settings:
Step 3 : Add Spotify Tracks to Download and Convert
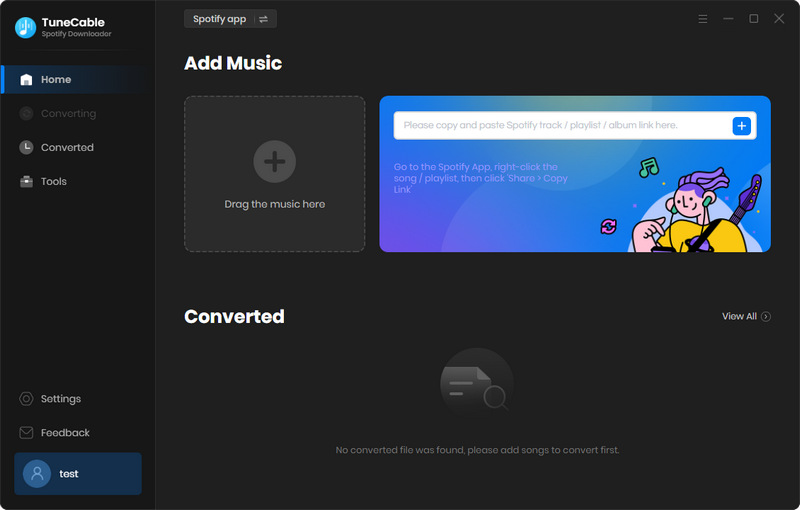
Now open the path of whichever songs, artists, playlist, podcasts, or radios that you wish to download. You can either drag and drop this path to the Spotify downloader or copy and paste it over the input box by pressing the + (add) button from step 1.
Step 4 : Convert the Spotify Audio File
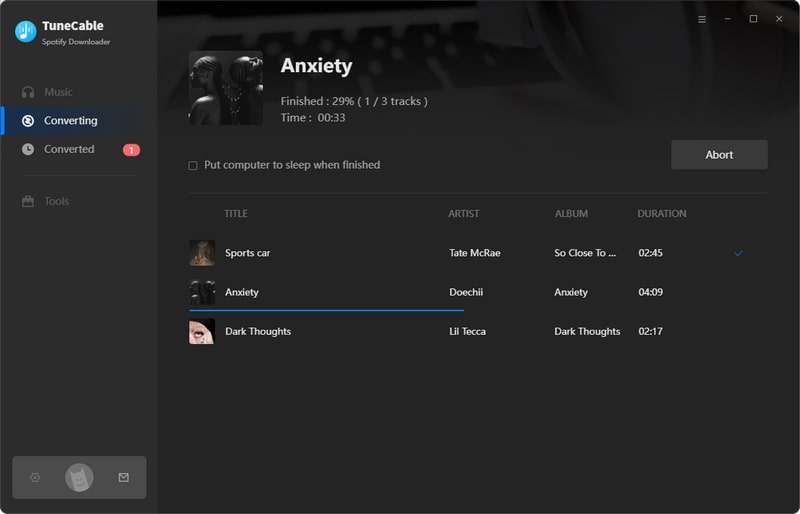
Once you're sure of your selected playlist and are done adding or removing the tracks, just click the Convert button to initiate the process.
Step 5 : Check Converted history
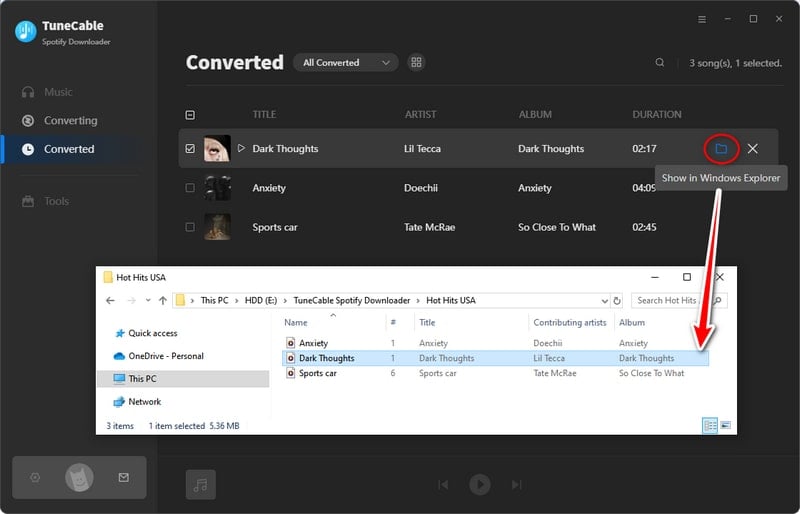
After the conversion is completed, all the downloaded tracks appear on the History tab of the software. You can view and play all your files right there. But if you want to check the downloaded files just go to your selected output folder.
Step 6 : Insert Blank CD and Select Files
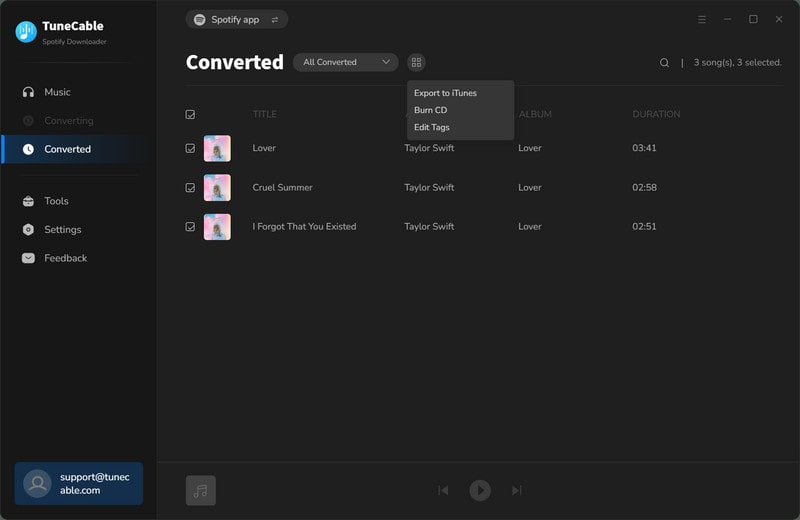
Once the files are converted and downloaded it is time to burn them onto the CDs. Select the files that you want to burn by clicking on the ticks beside the tracks. Confirm your selection and click on the Burn CD option. Ensure that you've carefully placed and secured.
Step 7 : Burn the Selected Music Files
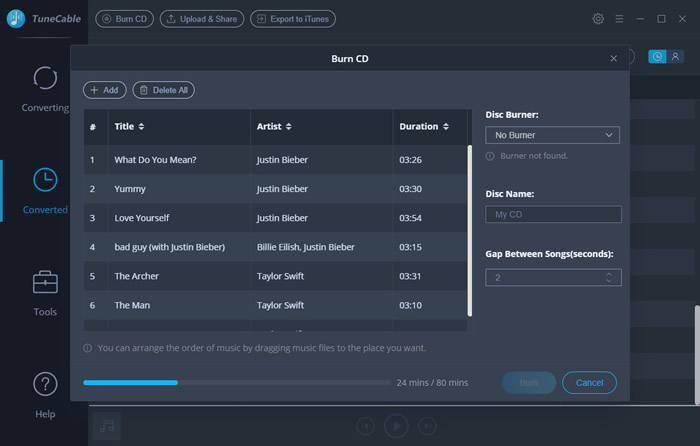
If you want to change the order of your playlist, just drag them to your required place. You can even rename the name of your CD and extend/contract the gap between the songs. Once everything is set to your requirements, click on the Burn tab.
What if you are a dedicated Apple Music user instead of Spotify? Well, similar to Spotify, Apple Music player, too, encrypts all its music files with its extension AAC or ALAC. The default iTunes extension AAC and ALAC prevents the downloaded files from being copied and converted. And if you want to avail all the high-quality music files from the platform, you would need the help of an Apple Music Converter, and what better is the TuneCable iMusic Converter. This powerful tool easily converts all the music files while still maintaining its high streaming quality. The converter helps in recording the protected AAC files on Apple Music and converting them into any format including AAC, AIFF, MP3, FLAC, WAV, and ALAC which can then be played offline. The software is available on Windows and Mac operating systems.
Before starting the conversion process, download the TuneCable Apple Music Converter from the official website. Once installed, start the given process –
Step 1: Launch the TuneCable Apple Music Converter
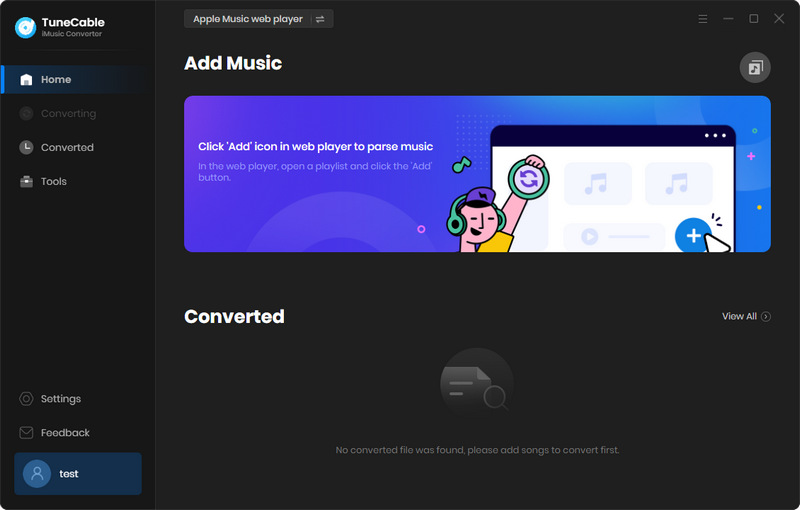
Once the application is installed launch the software on your device. On the main screen you will find a large + (add) tab; click on the tab to add the files that you want.
Step 2: Select the Apple Music files to convert
TuneCable would start to automatically scan your iTunes library and all your music will be listed down on a pop-up window. Just select the files that you want to convert and click on the OK toggle.
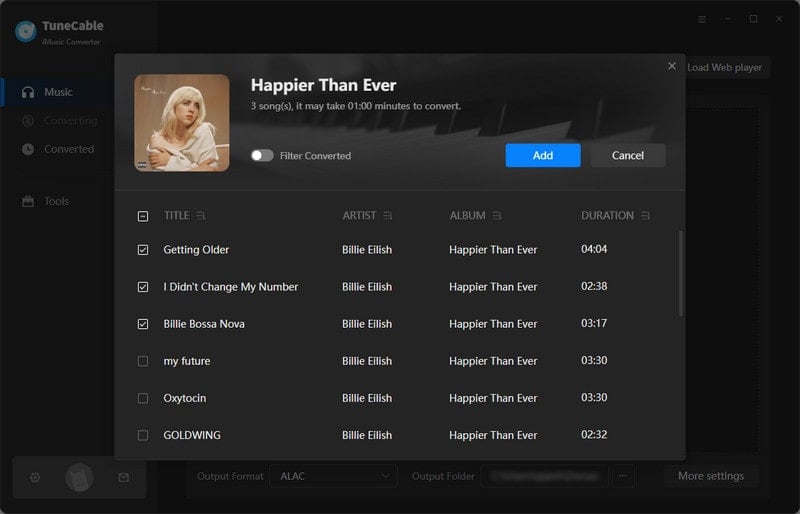
Step 3: Record the files into the format that you desire
Go to the Settings tab present on the top right corner of your window and select the formats like AAC, MP3, AIFF, FLAC, WAV, or ALAC, output path, conversation mode, and more from the Convert Settings. You can even change the output folder under the Output Settings.

Step 4: Find your recorded files on the Converted tab
Click on the Convert toggle to change the format of all your files. Once downloaded you can find the files on the Converted module or in the local folder.
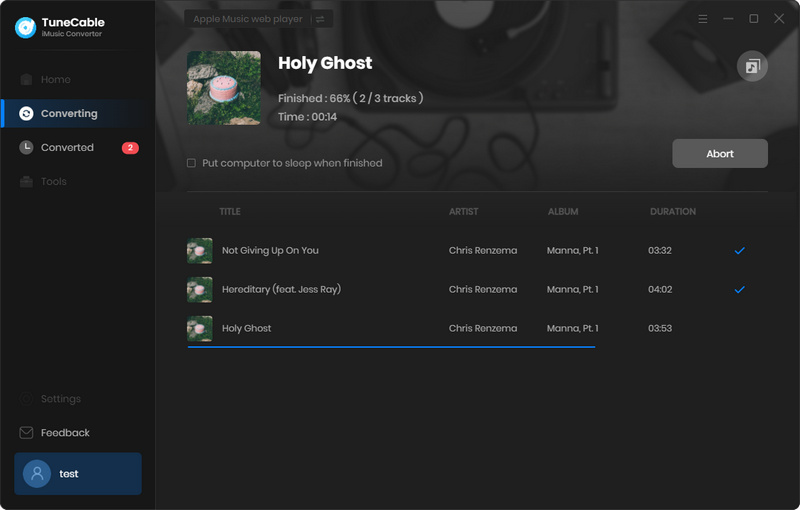
Step 5: Select Songs to Burn CD
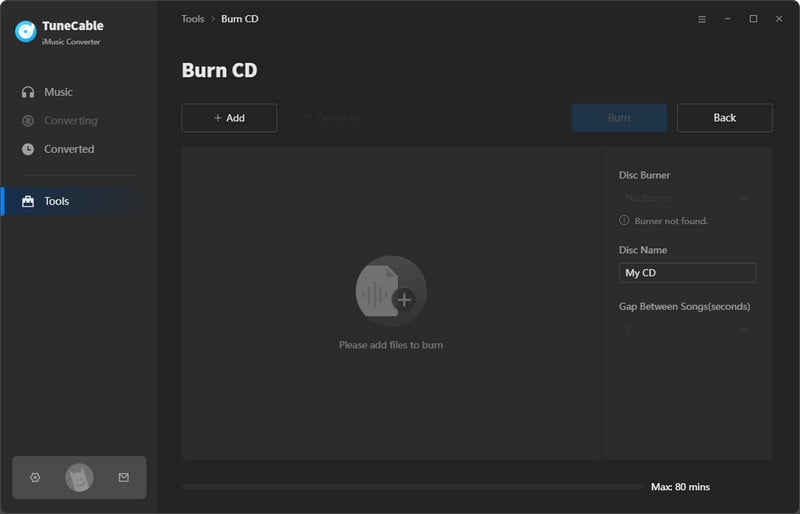
After downloading the files, it is time to burn them onto the CDs. Make sure that you have a disc drive and a blank CD inside it. Make sure that the drive is CD-RW (this program doesn’t support DVD burner). Go to the Converted module of the program and find the Burn CD toggle on the upper left-hand corner. Select the required songs and that toggle would light up.

Step 6: Finally Burn CD
A new pop-up window would appear through which you can customize the disc name and the gap between the music files. If you want to add more songs click the Add toggle and for changing the order simply drag and put the songs in the required order. When you are satisfied with the order, tap on the Burn toggle. The process will start immediately.
Amazon is a massive company that is known for being the biggest e-commerce site on the planet. It has also expanded its business beyond the realms and entered into the shows and music. The Amazon Music Unlimited is a subscription service that gives you access to a large 75 million+ library of songs. But as with Spotify and Apple Music, the songs of Amazon Music too are protected by the platform and cannot be used independently without the platform.
But we have the perfect solution in the form of TuneCable Amazon Music Converter. It helps in transcending this issue by recording the files from Amazon Music Unlimited and saving them for offline streaming. These locally downloaded files can then be either converted further or sent to other devices. The recorder is also not limited by platforms - you can download it on both Windows and Mac. The only drawback is, it doesn’t support directly burning Amazon Music to CD. So first you need to use this tool to download the songs from Amazon, then burn them into a CD with other tools. We’ll show you the process below.

First, ensure that you have downloaded the TuneCable Amazon Music Recorder on your device. Once the software is ready to go, follow the given steps –
Step 1: Open the TuneCable Amazon Music Converter
Once your software is installed, simply launch the application, and the main interface would appear in front of your screen.

Step 2: Customize your required Output Parameters
Next, go to the Settings option that you will find in the upper right corner. Here you can customize your output parameters according to your requirements. Under this, you can select the extension of your file, output quality, naming format, and path. You can even choose where you want the downloaded files to end up on your device.

Step 3: Select the files you want to download
Go out of the settings and start selecting the songs that you wish to download. You can drag and drop their paths or copy-paste them on the TuneCable. The software would automatically start reading the files from Amazon Music. Make sure that you have got all the files and then press OK.
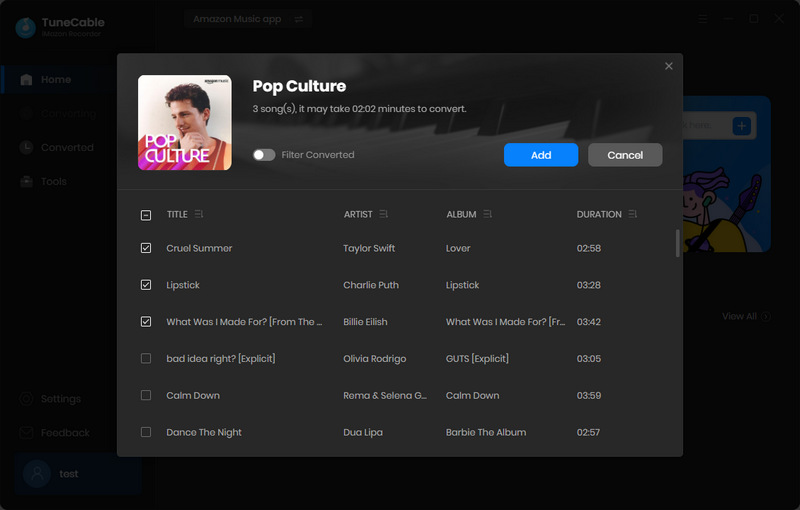
Step 4: Download and convert the track
Click the Convert button at the bottom. This will start the process by exporting the files out of Amazon Music.

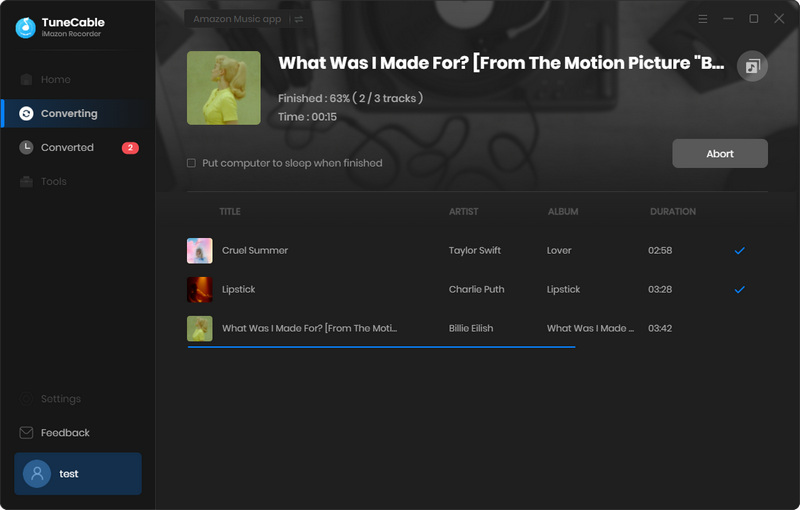
Step 5: Go to the Download history
Once the download is finished you can find the completed files on the History module. The files over here are sorted by timeline, so you can see your earlier conversions as well.
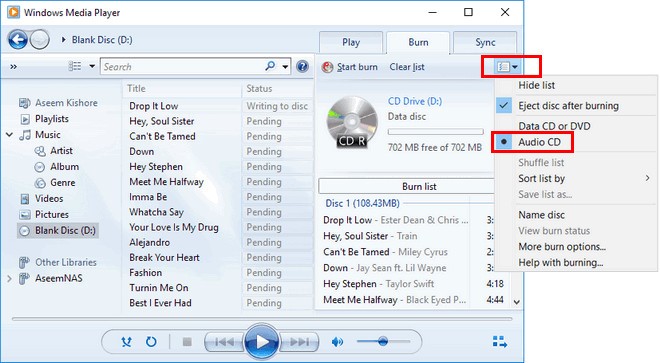
Unfortunately, TuneCable does not offer a Burn to CD option with Amazon Music. But worry not! There are two different ways you can achieve the same results. These include:
Step 1 Ensure that your device supports a disk drive to a blank CD or DVD. The device should be compatible with your file format.
Step 2 Launch Windows Media Player and press the Burn toggle.
Step 3 Drag and drop all the files that you want to burn on the Burn pane.
Step 4 Press Start Burn.
Step 5 Once the process is completed it will show you a notification about the completion. Take your disk out and use it to stream all your favorite songs.
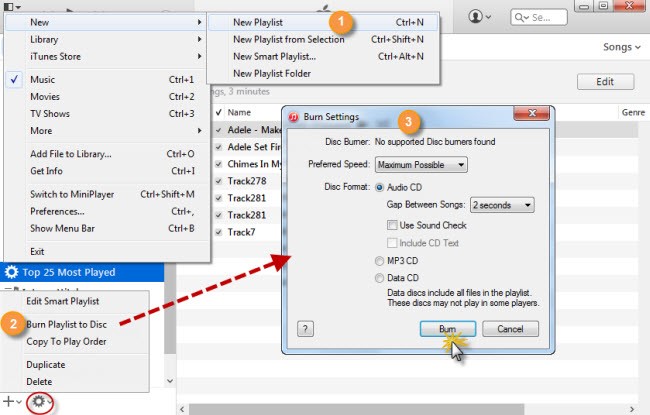
If your computer has the iTunes application installed then you can use it to burn the If you do have the desktop version of Spotify downloaded with the downloaded files. To do so –
Step 1 Launch the app and create a playlist with all your required songs.
Step 2 Open Menu-Open-Open Playlist and drag and insert all your files on the playlist.
Step 3 Now, insert your CD.
Step 4 Go to the Settings option and select the Burn Playlist to Disc.
Step 5 A new pop up window will appear and you can customize the name of the CD, preferred speed, and format.
Step 6 Press Burn and wait for the process of copying to finish. After completion another pop-up to inform about the end of the process would appear.
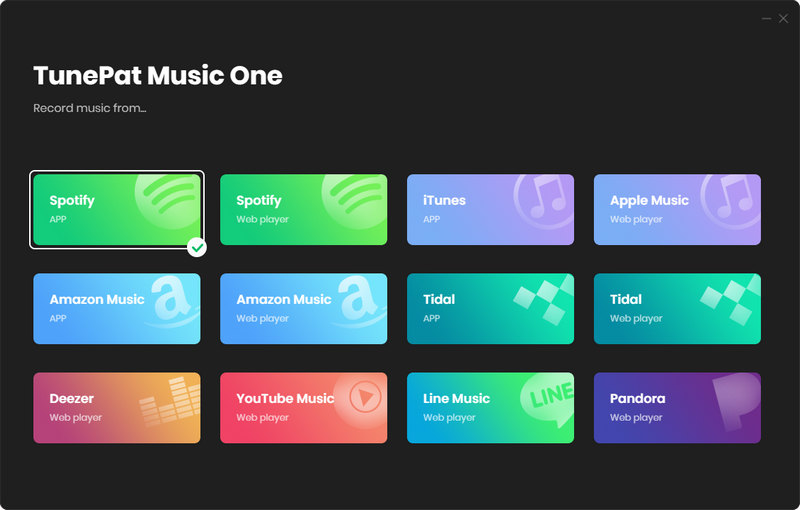
Want to use only one tool to burn any music to CD? That comes true now. TunePat Music One is an all-in-one music downloader for Spotify, Apple Music, Amazon Music, Tidal, Deezer, etc. It not only can download music from multiple streaming services, but also convert music to plain MP3, WAV, AAC, AIFF, ALAC, and FLAC files. You don't have to worry about ID3 tags or conversion speed since TunePat can retain full tags and can proceed with music in batch at up to 10X the speed. Additionally, TunePat offers a tool to burn music to CDs. That means you can burn any music, including Spotify, Apple Music, and Amazon Music to CD with only one program. However, since this TunePat program works by accessing web playesr, which offer lower sound quality than the app, and the output audio quality is lower than TuneCable. For instance, TuneCable can preserve Tidal master quality and Amazon Ultra HD, while TunePat cannot.
Step 1: Open the TunePat Music One
After installing the TunePat program on your computer, launch it. Select the music service that you want to download music from. For example, select Tidal. And the Tidal web player will then open as a popup. Log in to your account to access its library.
Step 2: Adjust Output Settings
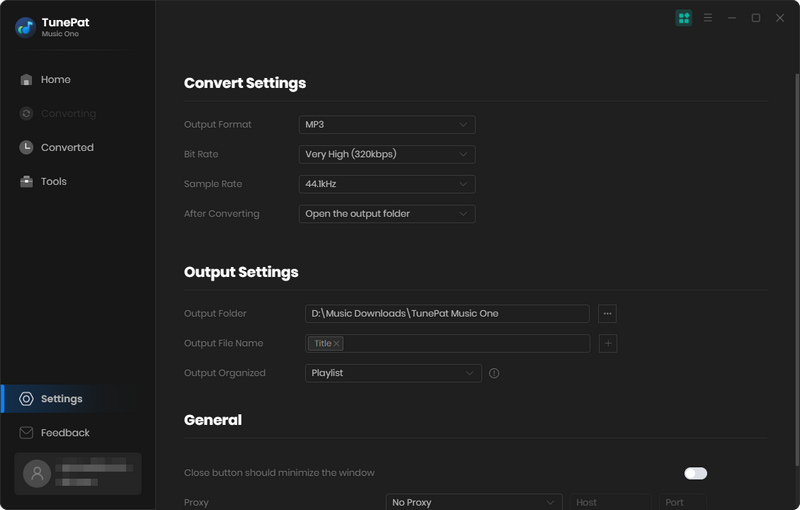
Before going on, you may change the output settings to make TunePat output music files with your preferred parameters. Simply head to the "Settings" column in the lower left corner of TunePat. Select an output format, output path, sound quality, etc.
Step 3: Add Any Music to TunePat
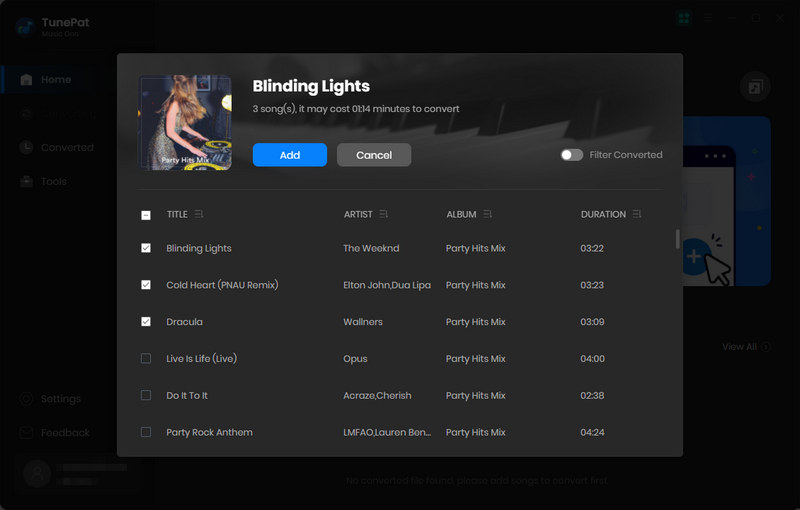
Go through the songs, playlists, or albums you want to burn. hit the "Click to add" icon to let TunePat parse and load the songs. Then you can pick any song on a popup. Next, you need to click on "Add" to confirm.
Step 4: Convert Songs on TunePat
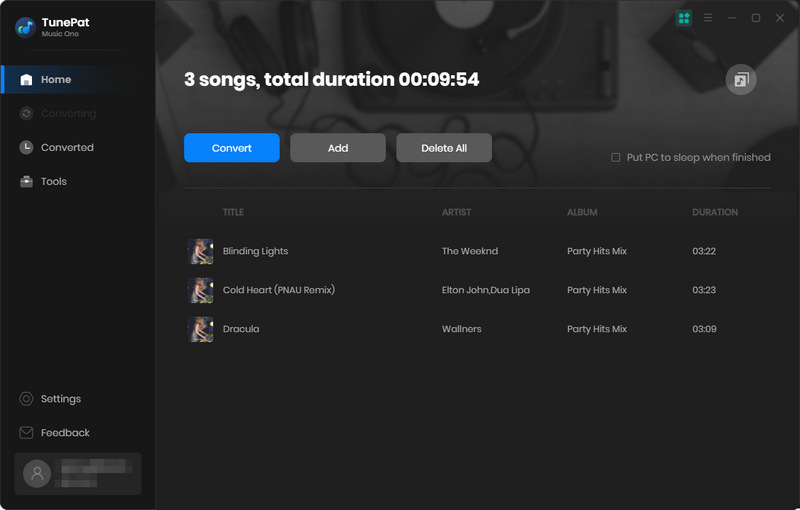
After adding all your favorite songs, click on "Convert" to start downloading the songs at once. And you just need to wait for the conversion to be complete.
Step 5: Burn Any Music to CD
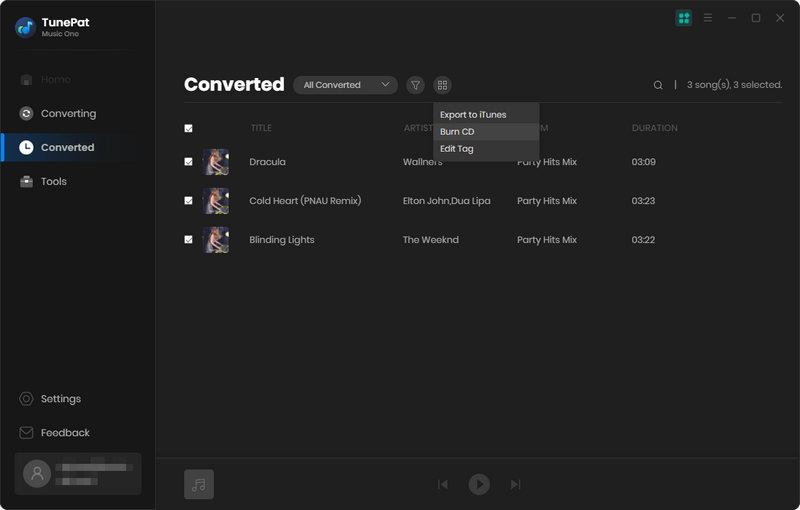
When the conversion is completed, head to the "History" module, which lists your download history. Tick the songs you want, click on the menu icon next to the filter icon, and select "Burn CD". Then plug your disc into your computer, and confirm to select it on TunePat. You can make other settings like Disc Name and the gap between songs. Finally, hit the "Burn" to start the progress.

As you might have gauged by now, TuneCable is amongst the best tools to burn streaming music to CD. It is a one-stop destination to convert and burn Apple/Spotify/Amazon Music to CD with ease. The simple nature of its interface ensures that you can easily navigate the crevices of the conversion process without needing expert knowledge. You need not waste money on extra software as these 4 music downloaders and converters would ensure to meet all your needs right in one place. Exciting thing is, you can use TuneCable to download music from different platforms to plain AAC/FLAC/MP3/WAV/ALAC/AIFF audio format, and then burn these music to CD by the program or WMP/iTunes.
 What's next? Download TuneCable Spotify Downloader now!