

TuneCable Apple Music Converter
Apple has always been at the forefront of technology. It constantly updates the iOS version to meet the changing needs of its users on a daily basis. In this fast-paced era, it has never fallen behind. However, not every iOS update brings pleasant surprises, and sometimes it may introduce unforeseen bugs. Recently, many users have complained that after updating to the latest iOS, their songs in Apple Music Library or iTunes Library have disappeared. This is undoubtedly a fatal blow to many Apple Music subscribers and is simply unacceptable. This article will explore the reasons behind this issue and provide some recovery methods.

Several potential causes could lead to the disappearance of your Apple Music Library. The range of reasons behind this problem is vast, making it impossible to list them all here. However, if you're eager to resolve this issue immediately, feel free to skip ahead to view our suggested solutions.
1. Data Loss Caused by System Update:
Data loss is a potential risk when updating the iOS system. This is because updating the system requires rewriting data, and during this process, the original data may be overwritten or deleted. Therefore, system updates could be a contributing factor to the disappearance of the Apple music library.
2. Insufficient Storage Space:
When the storage space on our phone is running low, the system will automatically remove some less frequently used apps and data to free up space. If the storage space where the Apple music library is located is inadequate, the system may delete it, resulting in the disappearance of the music library.
3. Account Issues:
If there are any problems with our Apple Music account, such as being logged out or banned, then we will not be able to access the music library when trying to log in to the account. Thus, account issues could also be a possible cause for the disappearance of the Apple music library.
In reality, each iteration of the iOS update appears to inflict a diverse range of complications for certain Apple Music users. The recent rollout of iOS 18 has reignited a flurry of grievances and complaints. If you have recently upgraded to the latest iOS 18 or a more advanced version and have noticed the disappearance of your cherished songs from your Apple Music Library or iTunes Library, fear not - this article provides a comprehensive repertoire of potential solutions that may come to your aid.
Related Article: How to Fix Apple Music Not Working Issues>>
When you are unable to play songs in your Apple Music library, you should check your internet connection. You can try turning off WiFi or mobile data and then turning it back on, or switching to a different network and trying again. If the problem persists, you can try restarting your device.
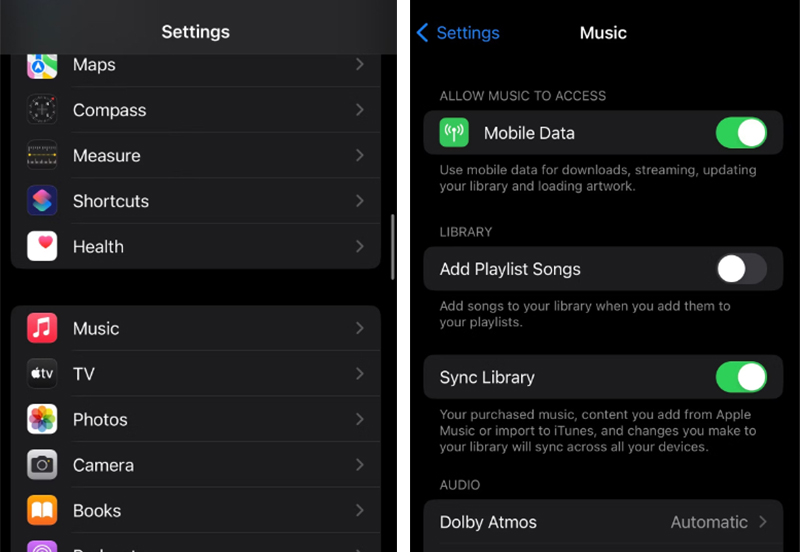
You should enable Sync Library to make songs appear. Follow the steps to open Sync Library on all your devices. Please note that you need a subscription to Apple Music or iTunes Match to access Sync Library. If you are not a subscriber to both of them, then you should manually sync music.
✦ Turn Sync Library on Mac
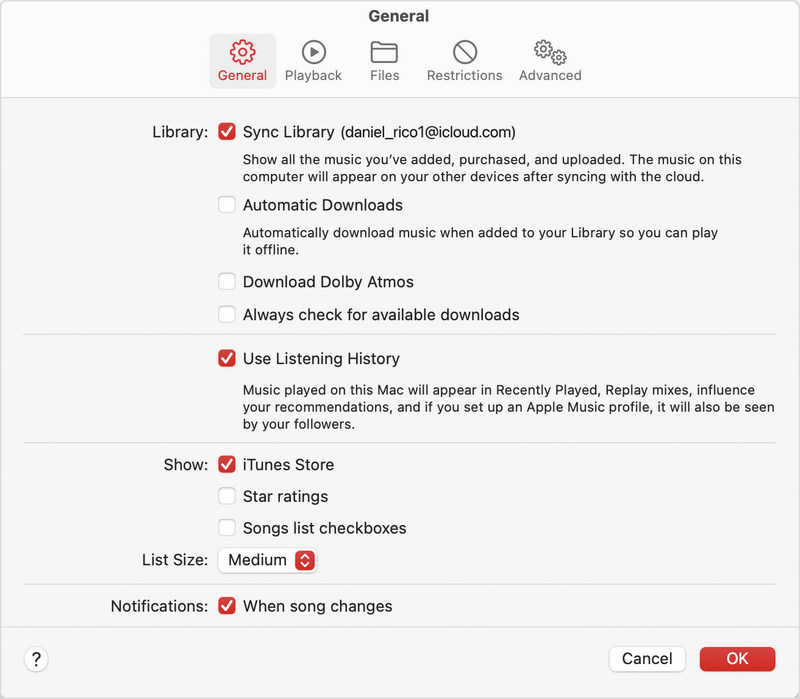
✦ Turn Sync Library on PC
✦ Turn Sync Library on iPhone/iPad
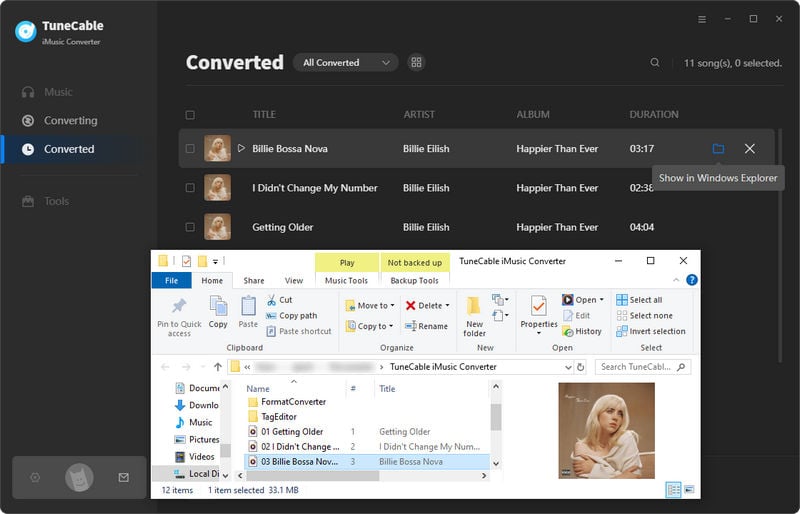
To the best of my knowledge, this is a highly efficient and straightforward approach. If you are an experienced user of TuneCable, your chances of recovering your Apple Music Library are relatively high. However, even if you are not, you can still try downloading the TuneCable Apple Music Converter. It enables you to download multiple music lists in various formats (MP3, AAC, FLAC, WAV, AIFF, ALAC) with just one click. Moreover, all Apple Music songs, playlists, and iTunes audio files will be saved locally, ensuring that you never lose access to your cherished Apple Music Playlists. This is truly the ultimate solution.
Step 1: Launch TuneCable Apple Music Downloader on your Windows PC or Mac.
Step 2: There are two options on the start-up page: "iTunes" ("App" for Mac) and "Web Player". Choose the former option.
Step 3: When you are asked if you want to update your Apple Music playlists, choose not to update it for this time. And click on "+Add" to load your Apple Music playlists and iTunes library.
Step 4: Select the songs you need and click on "OK" to download them in one click.
Step 5: If you need, you can go to "Settings" to customize the output parameters in advance, such as output format, bit rate, sample rate, output folder, output file name, output organized way, etc.
Step 6: After that, simply click "Add More" to add more songs to the download list or click on "Convert" to perform an instant conversion.
Step 7: You can find the download history under the "History" column. The downloaded Apple songs are stored on your local PC or Mac.
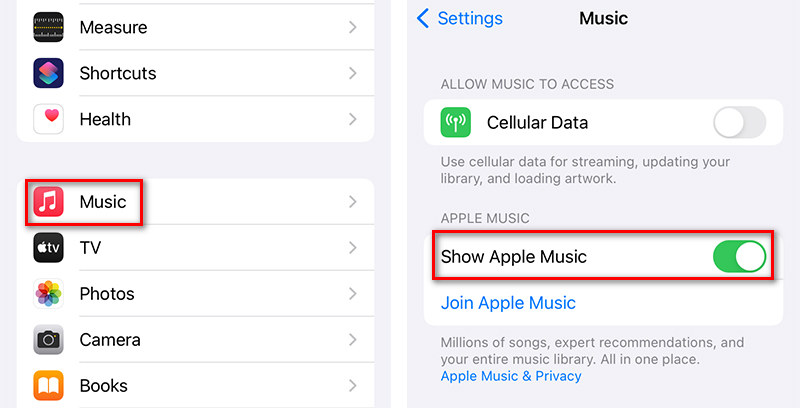
If you find that your Apple Music library is empty, you should first ensure that you have activated the "Show Apple Music" option.
Step 1: Open the "Settings" app and choose "Music".
Step 2: Toggle the "Show Apple Music" on if it's disabled.
Step 3: If it's already turned on, you can turn it off and open it again.
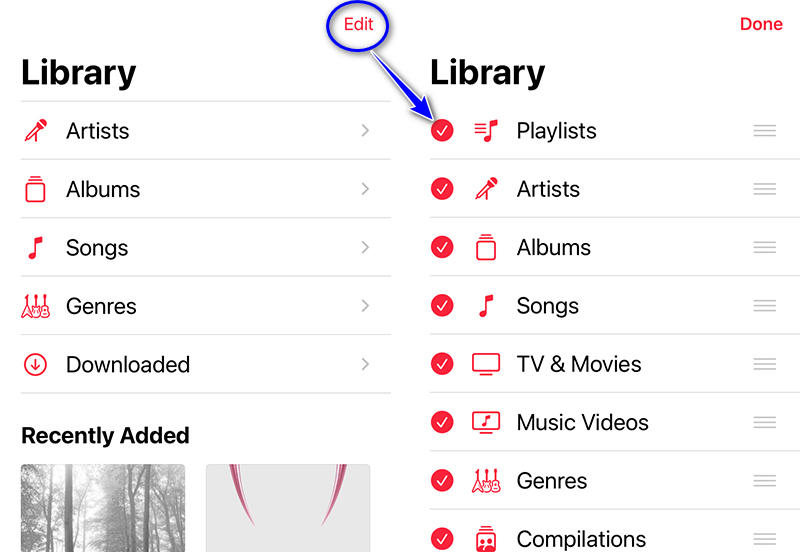
When the "Apple Music Playlist" option is disabled, you may experience an issue where your playlists are not visible on your device. It can be quite perplexing as it may seem like all your playlists have vanished. However, this problem can be resolved by enabling the option in the Apple Music app. Here's how:
Step 1: Launch the Apple Music app on your mobile device.
Step 2: Navigate to "Library" and tap on "Edit". If you observe that the "Playlists" option is deactivated, proceed to activate it.
Sometimes, the iOS bugs can be fixed after force start. Press the "Power Button" and "Home Button" simultaneously until you see the Apple logo. Allow your iPhone to restart. Be mindful to not press and release both buttons immediately, as this will only take a screenshot.
If the available storage on your iPhone or iPad is insufficient due to the accumulation of an excessive amount of files, it may potentially hinder the proper loading of your Apple Music library. To rectify this issue, you can assess the remaining storage capacity of your device and selectively remove any superfluous files. Subsequently, attempt to relaunch the Apple Music application to observe if the problem persists.
To use Sync Library, you need to subscribe to Apple Music. You can also use Sync Library with an iTunes Match subscription. You are allowed to use Sync Library unless you become a subscriber to Apple Music or pay for an iTunes Match subscription. If you end the renewal to Apple Music or iTunes Match, you are deprived of playing the songs. Subsequently, the songs or playlists you added or downloaded from the Apple Music catalog are removed from all of your devices. You can try renewing the subscription as soon as possible and ask their support team to recover your library. According to other users, you are not supported to recover the library after a long period of unsubscribing.
When logging in with multiple devices, if some of them are not signed in with the same Apple account, it can result in failed syncing. This may lead to a false assumption that all your favorite music collections have vanished. Get physical access to your devices and check them one by one. Log out and log in with the same Apple ID when you find the difference
✦ Check Account on Mac: Start the Apple Music app and click on "Account" in the menu bar.
✦ Check Account on PC: Open the iTunes app and then go to the top menu bar, and tap on "Account".
✦ Check Account on iPhone or iPad: In the Apple Music app, click on the "photo icon" ![]() at the top. Scroll down and choose "Account Settings".
at the top. Scroll down and choose "Account Settings".
If your purchased music is missing, you can redownload the songs.
✦ Redownload Apple Purchased Music on Mac:
✦ Redownload Apple Purchased Music on PC:
✦ Redownload Apple Purchased Music on iPhone/iPad/iPod Touch:
The missing song can be located on your Mac or PC. You can find them and restore them to your Apple Music library.
Step 1: Search your Mac or PC for the missing song.
Step 2: Drag the songs to your Apple Music app or iTunes when you find the locally stored Apple songs.
Step 3: In the Apple Music app, choose "File > Library > Update Cloud Library". In the iTunes app, go to "File > Library > Update iCloud Music Library".
Step 4: You can locate where the Apple songs are stored, and then recover them.
You can also take the following steps to restore a playlist that has been deleted from Apple Music. By updating your music library, you can resolve issues with missing Apple Music playlists. Here's how to update your music library:
Tips: Prior to updating iCloud Music Library, you'd better download the Apple Music Playlists to your local PC or Mac as a complete backup in case of data loss.
✦ On Windows:
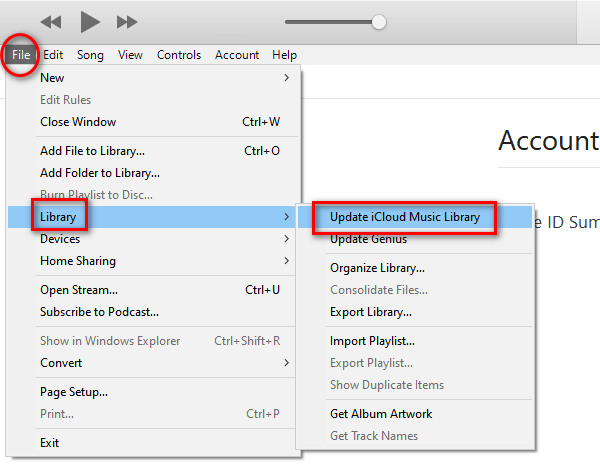
✦ On Mac:
Did you check the cloud status of songs on your Mac or PC? The ignorance regarding the status of the songs in your music library bewilders you.
By understanding the status of each track, you can then take appropriate actions. Let's look at what each status means and find the corresponding solution.
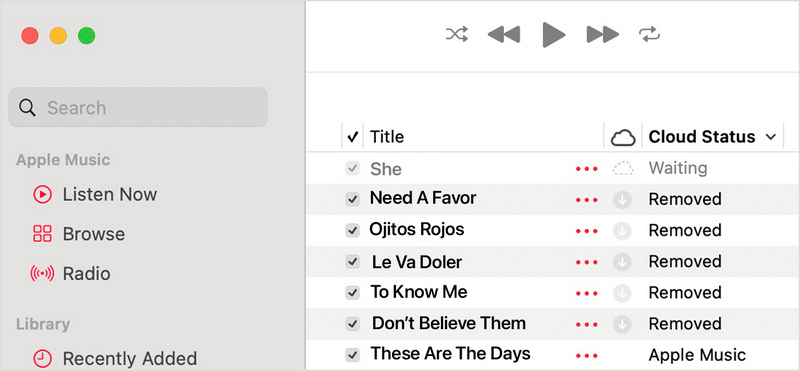
✦ An Exclamation Point:
It means that you are required to locate the original file and then you are enabled to play or sync this song across your devices. Here is how to fix it:
✦ Waiting:
It alerts you that this song is waiting to sync. As a result, it won't appear on your other devices.
✦ Removed:
It tells you that the song was deleted from another device that has Sync Library turned on. You can follow the steps below to make the song appear on your other devices again:
✦ Song Is Grayed Out:
If you purchased songs from the iTunes store, please authorize your computer to play the iTunes store-purchased songs.
If you see No Longer Available next to a song that's grayed out, the song was added from Apple Music and was removed from the Apple Music catalog.
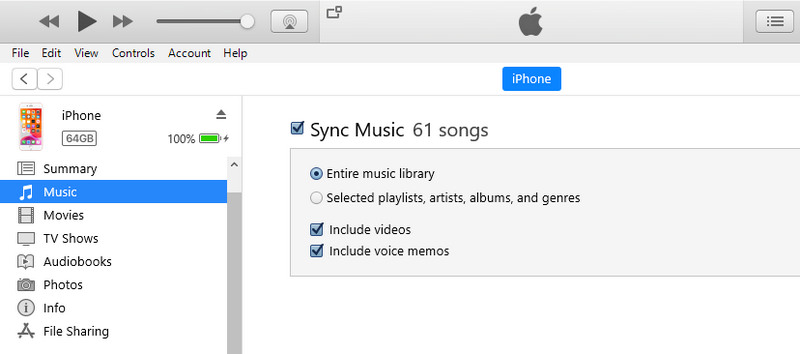
If you have ever perused your iTunes account or scrutinized the storage space of your iOS device, you may have observed that the storage space is partitioned into "Audio", "Apps", and "Other". In certain circumstances, when you upgrade iOS, Apple Music files may be inadvertently categorized as "Other" media. This can potentially lead to the predicament of the Apple Music library vanishing. To rectify this quandary, you can adhere to the following protocol to retrieve your Apple Music playlist:
Step 1: Connect your iPhone or iPad to your computer utilizing a USB cable and ensure that iTunes is operational.
Step 2: Within iTunes, pinpoint your "device icon" ![]() , click on it, and subsequently opt for the "Summary" tab.
, click on it, and subsequently opt for the "Summary" tab.
Step 3: Within the "Summary" tab, you will behold a list comprising all sections on your device. If the "Other" section appears conspicuously expansive, it is highly probable that your Apple Music playlist has been misallocated here.
Step 4: Choose "Sync Music". Synchronize your device with iTunes on your computer, and your eradicated playlist should resurface in Apple Music. Please note that your existing music playlists on your device may be overwritten. To avoid data loss, you should make a complete backup of Apple Music/iTunes Library locally.
In the Apple Music app, you will find recently deleted folders that help you avoid accidental deletion of songs. However, it only assists you with restoring recently disappeared songs, but it's still worth a try. Here are detailed steps to check.
Step 1: On your iPhone or iPad, go to the Music app and start it.
Step 2: Head to "Library" and tap on "Recently Deleted".
Step 3: From here you can see some recently deleted songs, you can restore them to your library by clicking on "Recover".
Perhaps you have triumphantly restored your Apple Music Library this time around, but with each successive iOS update, the anxiety lingers. Once was enough to endure such an ordeal. Consequently, safeguarding a backup of your Apple Music Library is paramount. While iCloud or iTunes backups may initially appear to be a viable option, they are often plagued by vexing bugs that impede successful restoration. Furthermore, the scope of files that can be backed up is restricted. In lieu of these conventional methods, why not endeavor to employ the ultimate solution and locally download all songs and playlists from Apple Music, thereby ensuring a comprehensive and secure backup?
To avoid having your Apple Music Library emptied again, TuneCable Apple Music Converter can help you batch-convert Apple songs, albums, and playlists to unencrypted MP3/AAC/WAV/AIFF/ALAC/FLAC formats. This way, you are freed from constraints. Not only will you no longer have to worry about the disappearance of songs from your Apple Music Library, but you will also unlock a world of possibilities. You can transfer the downloaded Apple Music tracks to various devices for offline playback, import them into different software, and share them with anyone you choose.
Key Features of TuneCable Apple Music Converter:

Here are the detailed steps to make a full backup of your Apple Music tracks, albums, playlists, and other audio files on a local PC or Mac.
Step 1 Initiate TuneCable Apple Music Converter
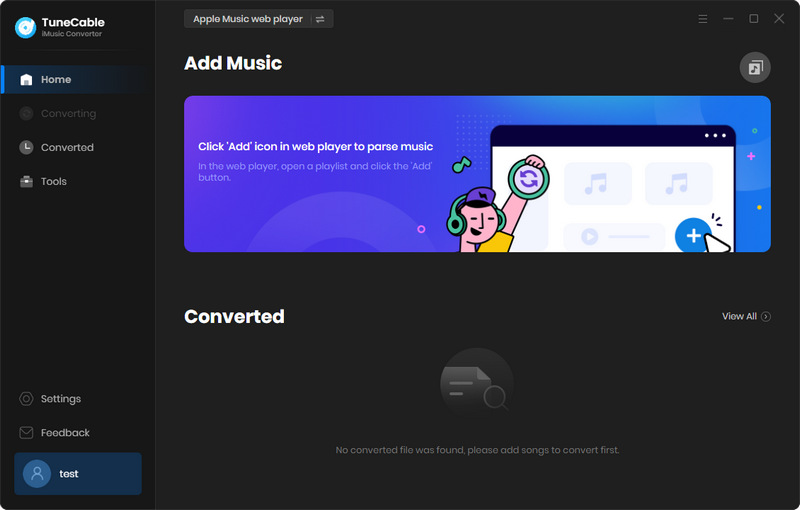
According to your system, select and download either the Windows or Mac version to install on your computer. After installation of TuneCable Apple Music Converter, launch the program. On the initial interface, you can choose whether to download songs from the iTunes app or the Apple Music web player. Generally, songs downloaded from the app have better sound quality, but downloading from the Apple Music web player is faster. Additionally, for Mac users, the "iTunes App" option has been changed to the "Apple Music App".
Step 2 Add Apple Songs to Download List
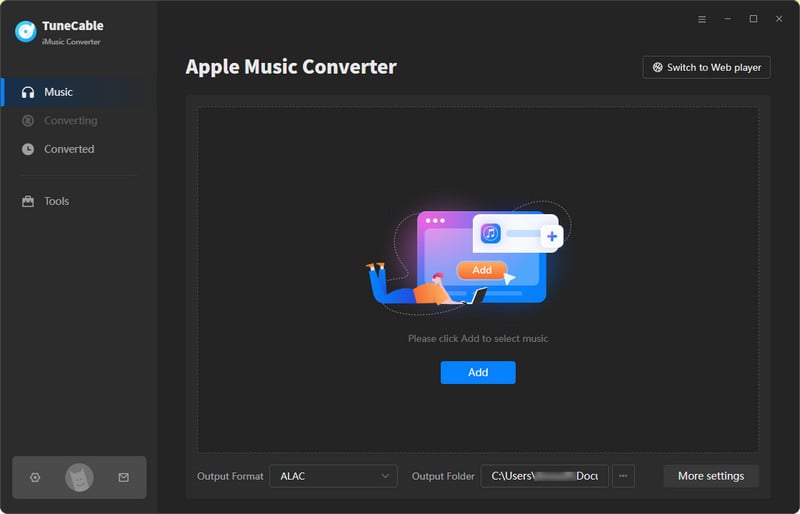
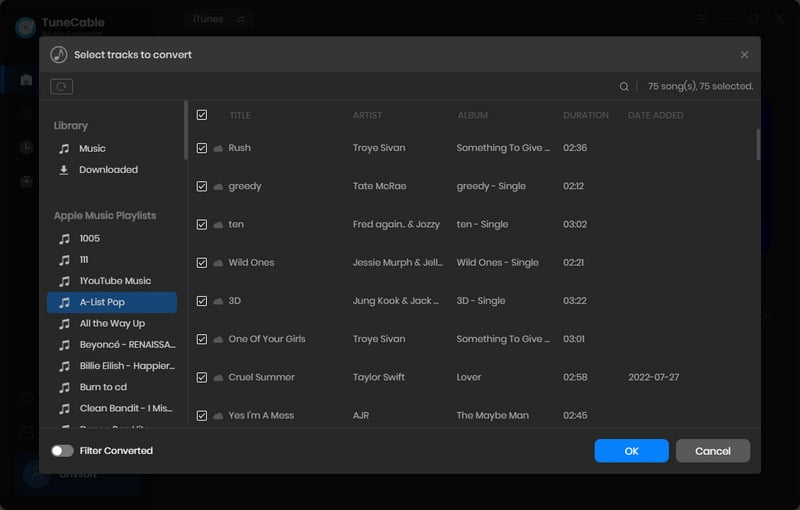
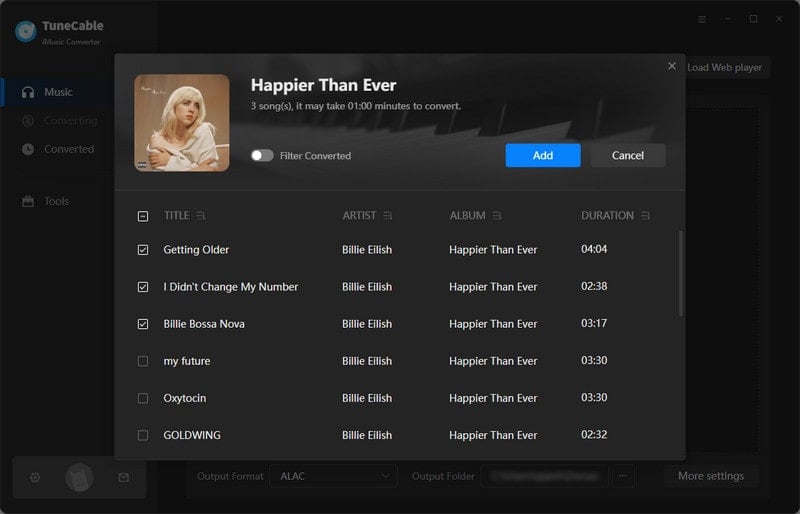
When recording music from the iTunes/Apple Music app, hit the "+Add" button on TuneCable. This program will load the iTunes library and Apple Music library for you. In the pop-up window, you are allowed to select iTunes downloads, audiobooks, and your Apple Music playlists. Tick off the wanted items and click "OK". Then selected songs will be added to a download list.
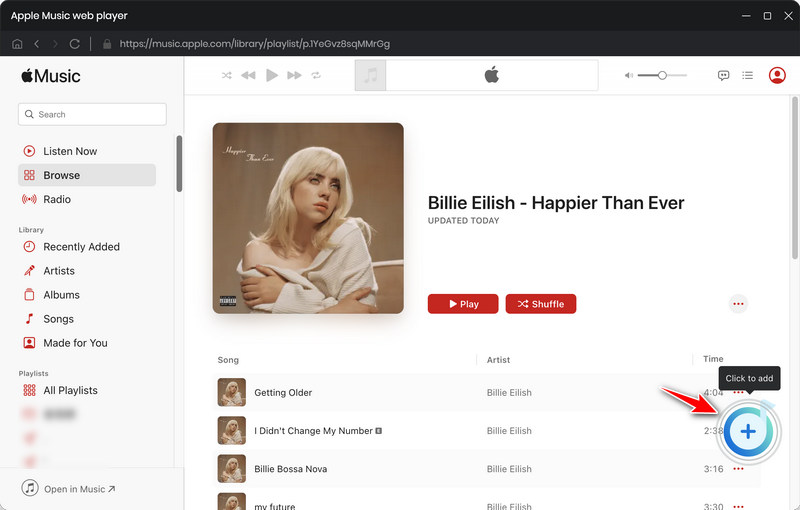
When recording music from the web player, you can add songs from the Apple Music web player directly. Search or browse for any song, album, or playlist you prefer, and open it. Go to the lower right, and hit the "Click to add" button. After this downloader loads the songs, you can choose the tracks you need and tap on "Add" to save them to a download list.
Step 3 Customize the Output Preferences
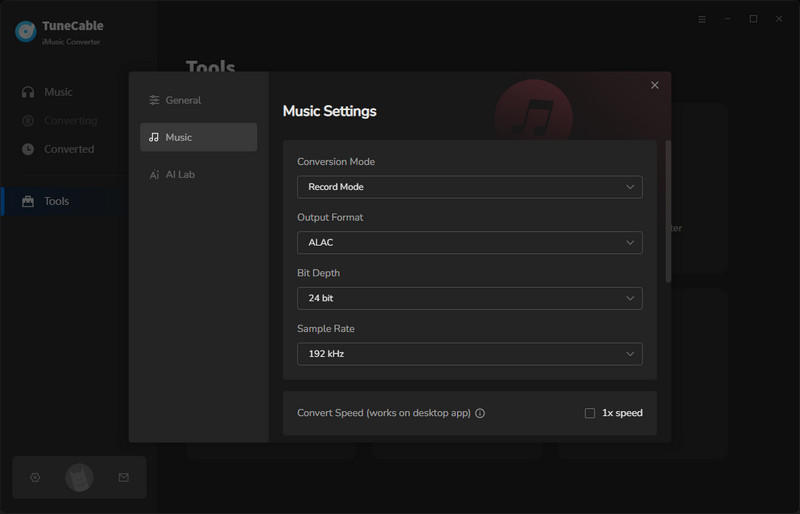
The individual output settings are necessary. Navigate to the "Settings" tab and click on it. It supports making changes to multiple parameters.
When planning to backup Apple Music tracks in their original quality and format, you can set "Recommended" in the "Output Format" setting. The organized output method is beneficial for archiving songs in your preferred manner and helps locate desired Apple songs, albums, or playlists quickly.
Step 4 Backup Apple Music Playlists as Local Files in Bulk
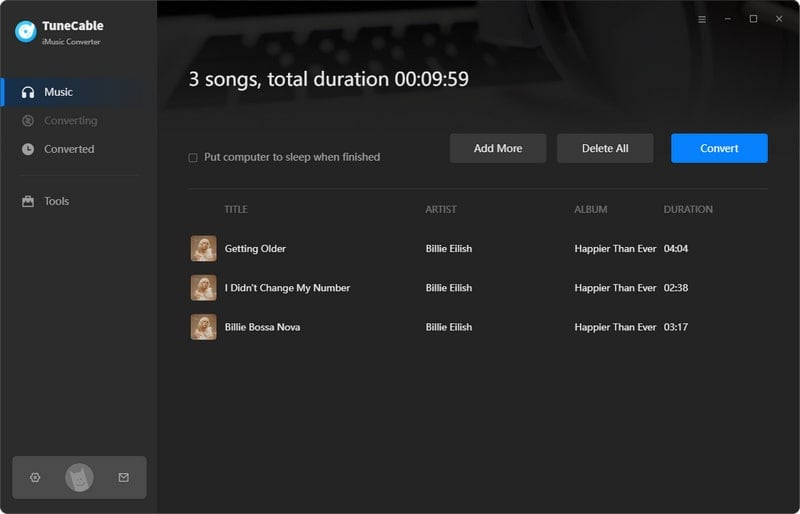
Once you finish the changes, go back to the "Home" column where the selected Apple songs are waiting for conversion. To convert more songs or playlists in bulk, choose "Add More". If not, direct to the "Convert" button to trigger an immediate conversion.
Step 5 Permanent Ownership of the Converted Apple Songs
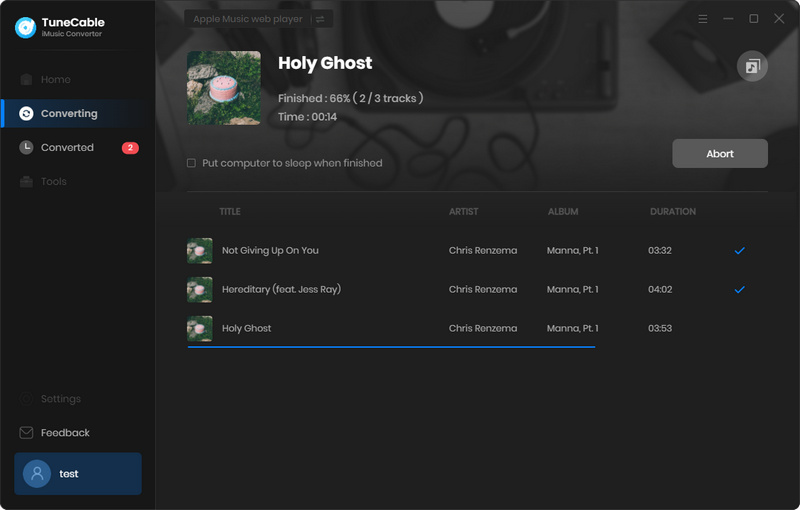
This tool will not interfere with your other tasks and operates silently in the background. Once the conversion is finished, you will receive a notification. The output folder will then appear automatically; if not, simply navigate to the preset saving path to locate all the converted files. The Apple songs will be arranged according to your specifications.

In this article, we have provided various solutions to resolve the issue of an empty Apple Music library after updating to a new iOS system. By performing a backup and restore, re-syncing, checking iCloud settings, and contacting official Apple support, you can attempt to fix many common problems.
However, if you do not perform a comprehensive backup before the next iOS update, your Apple Music Library may still disappear. Therefore, the best solution is to use TuneCable Apple Music Converter to download all your Apple Music Playlists locally for future reference. Additionally, these downloaded songs can also be used for various purposes according to your needs.
We hope that the solutions provided in this article will help you resolve the issue of an empty music library and allow you to continue enjoying high-quality music. May you find your own voice and rhythm in the musical world of Apple Music!
 What's next? Download TuneCable iMusic Converter now!