

TuneCable Apple Music Converter
In the world of music streaming, the experience isn't just about the songs you listen to but also how they flow together. Apple Music, one of the leading platforms in this space, offers a feature called Crossfade that allows tracks to blend smoothly from one to another, creating an uninterrupted musical journey. In this guide, we will explore what Crossfade is, how to enable it across various devices, troubleshoot any issues you might encounter, and even look at alternatives to enhance your listening experience further.

Indeed, crossfading serves as a seamless blending technique, eradicating the silence between songs' conclusions and beginnings. It accomplishes this by layering the waning moments of one audio track atop the nascent seconds of the subsequent one, mirroring the seamless transitions crafted by DJs. This functionality proves invaluable in settings where continuous music flow is paramount, be it lively gatherings, energetic workouts, or any occasion favoring uninterrupted melodies.
The process entails a controlled overlap of two tracks' audio, spanning a customizable duration, often a few seconds, to create a smooth, almost imperceptible shift. Users can tailor the extent of this effect, whether subtle or pronounced, by adjusting the overlap duration. Mastering and employing crossfading can profoundly enrich your Apple Music journey, ensuring your playlists maintain their dynamic energy and unwavering rhythm. The following are its main features:
![]() Seamless transition: Crossfade eliminates silent gaps between songs, creating seamless transitions.
Seamless transition: Crossfade eliminates silent gaps between songs, creating seamless transitions.
![]() Enhance the listening experience: Provides a continuous flow of music, ideal for parties or workouts.
Enhance the listening experience: Provides a continuous flow of music, ideal for parties or workouts.
![]() Custom duration: Users can set the duration of cross-fading, typically between 1 and 12 seconds.
Custom duration: Users can set the duration of cross-fading, typically between 1 and 12 seconds.
![]() DJ-like Mixing: Mimics the techniques used by DJs to mix tracks for a professional feel.
DJ-like Mixing: Mimics the techniques used by DJs to mix tracks for a professional feel.
![]() Multi-device support: Accessible on Apple Music via iOS, macOS, and Windows platforms.
Multi-device support: Accessible on Apple Music via iOS, macOS, and Windows platforms.
![]() Simple opening: Easily enable and adjust in the Apple Music or iTunes settings.
Simple opening: Easily enable and adjust in the Apple Music or iTunes settings.
Having covered the basic concept of Crossfade in Apple Music, we will now delve into detailed instructions on how to enable and configure this feature across various platforms. Enabling Crossfade on Apple Music varies slightly depending on the device and operating system. Below are the detailed steps for each platform.
Crossfading in Apple Music involves updating your device to iOS 18 or 17. This can be accomplished through the "Settings" application. Navigate to the "General > Software Update" option to download and install the latest iOS version.
iOS and iPadOS users need to enable the Crossfade feature through their device's system settings.
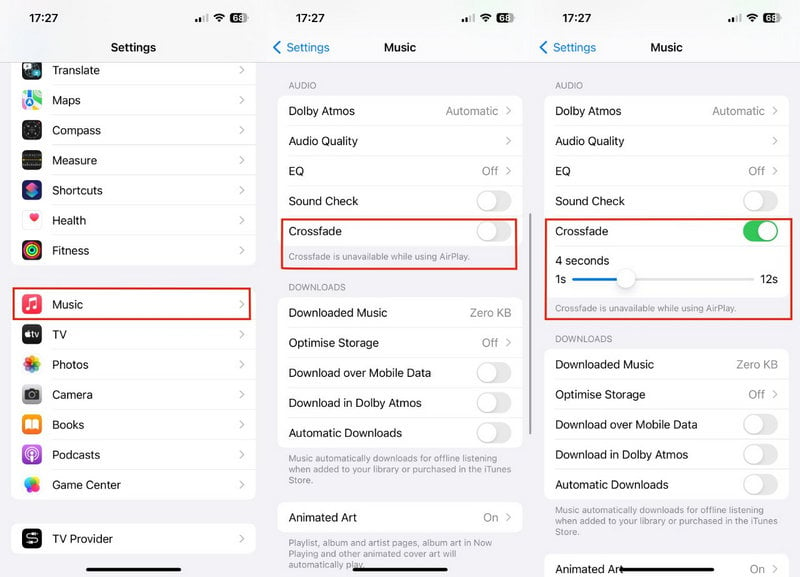
>> Crossfade Apple Music on iPhone
Step 1: Go to the Settings app on your iPhone.
Step 2: Scroll down and tap on "Music".
Step 3: Find the "Crossfade" option and turn it on.
Step 4: Use the slider to adjust the crossfade duration.
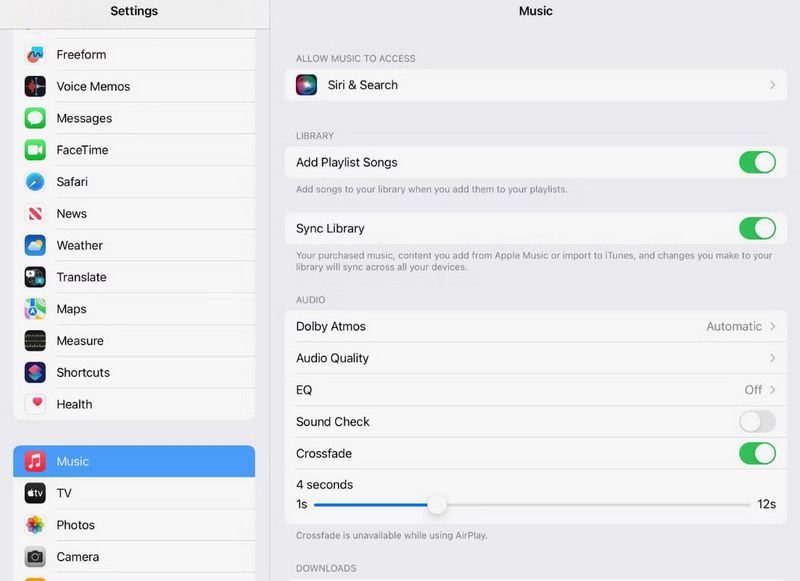
>> Crossfade Apple Music on iPad
Step 1: Launch the "Music" app on your iPad.
Step 2: Tap on the "Music" option in the "Settings" app.
Step 3: Toggle on the "Crossfade" option.
Step 4: Drag the slider to set the fade-out duration.
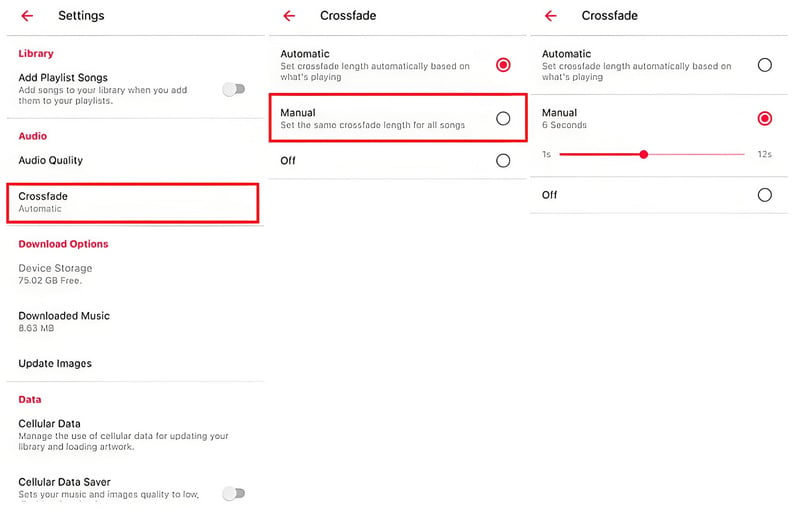
Android users can also enable the Crossfade feature within the Apple Music app.
Step 1: Launch the Apple Music app. Ensure that your app is updated to the latest version.
Step 2: Tap on the "ellipsis icon" located in the upper-right corner of the app, then select "Settings".
Step 3: Within the settings menu, scroll down to the "Audio" section.
Step 4: Enable the "Crossfade" feature and adjust the duration of the fade-in and fade-out intervals.
Automatic: This setting adjusts the crossfade length dynamically based on the content being played.
Manual: For greater control, choose the manual option and modify the crossfade duration. The duration can be set between 1 and 12 seconds. Higher values result in a longer crossfade effect.
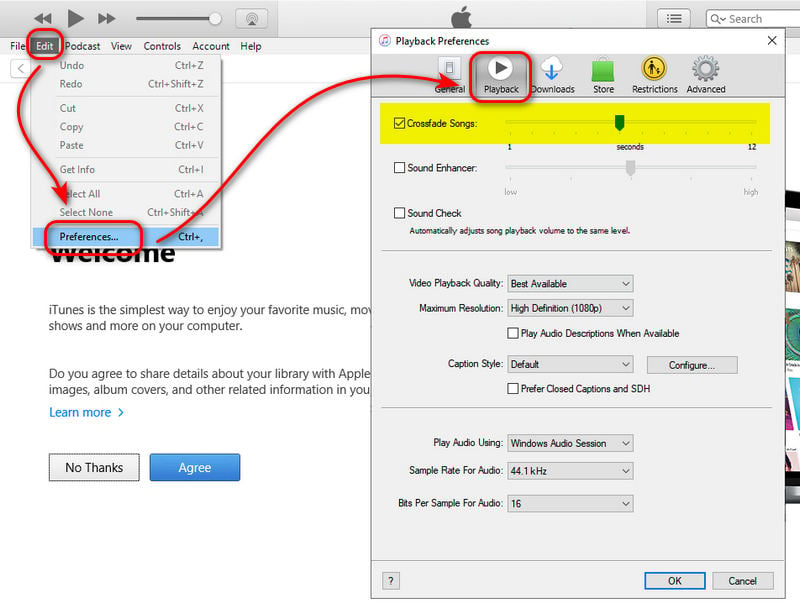
>> Crossfade Apple Music via the iTunes App
Step 1: Open the iTunes app on your Windows PC or Mac.
Step 2: Locate and click on the "Edit" button positioned at the top of the iTunes interface.
Step 3: From the dropdown menu that appears, choose "Preferences".
Step 4: Inside the Preferences window, navigate to the "Playback" section.
Step 5: Tick the checkbox beside "Crossfade Songs" to enable this feature.
Step 6: Adjust the crossfade slider to your preferred duration, which can be set anywhere between 1 and 12 seconds.
>> Crossfade Apple Music via the Apple Music App
Step 1: Launch the Apple Music app on your Windows. Open the Music app on your Mac.
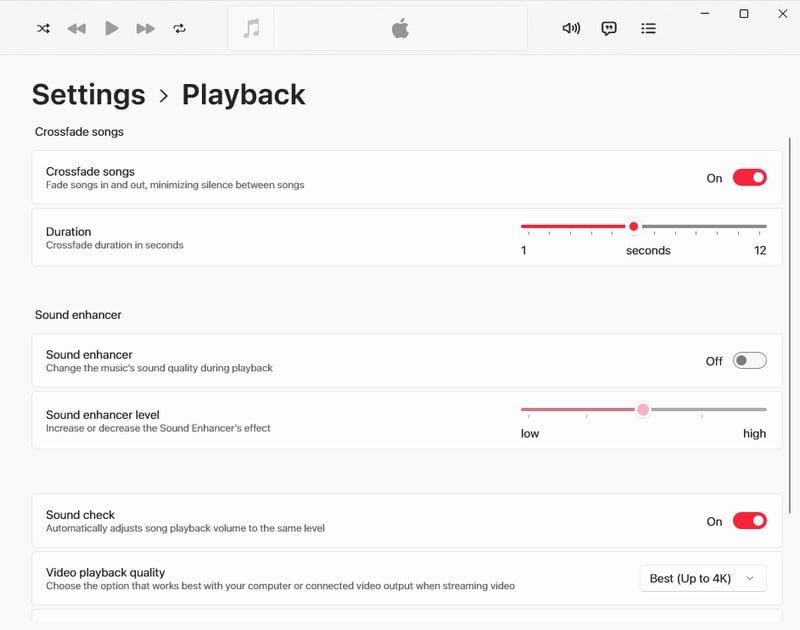
Step 2: Click on Music" in the menu bar and select Preferences. On Windows, click the "three dots" icon in the upper left.
Step 3: Go to the "Playback" tab.
Step 4: Check the "Crossfade songs" option.
Step 5: Adjust the slider to set the crossfade duration.
While Crossfade is a fantastic feature, you may encounter occasional issues. Here’s how to troubleshoot common problems:
1. Update Software: Ensure your device and the Apple Music app are up-to-date.
2. Review Crossfade Settings: Ensure Crossfade is activated in your settings and adjust the duration to your preference. Ensure the Crossfade time setting is optimal. An overly short or long duration may compromise the transition effect.
3. Re-enable Crossfade: Temporarily disable then re-enable the Crossfade feature to reset its state.
4. Restart App: Close the Apple Music app completely and then relaunch it.
5. Restart Device: Restart your device or log back into your Apple Music account to refresh the app's state.
6. Reset Apple Music Settings: Navigate to Settings > General > Reset > Reset All Settings (for iOS) or clear the app's data and cache (for Android) to restore default settings.
7. Try Other Apps: If issues persist, consider importing your Apple Music playlists to other music apps for a potentially better experience.
1. Modify Crossfade Time: Experiment with shorter or longer crossfade durations.
2. Stable Connection: Ensure a robust internet link when streaming music.
3. Cache Cleanup: Clear app cache for Android, or reboot for iOS to clear temporary files.
1.App Update: Ensure Apple Music is up-to-date with the latest version.
2.Compatibility Check: Verify that your device and OS support Crossfade functionality.
3.Reinstall App: Uninstall Apple Music and then reinstall it from scratch.
1. Check Network: Ensure a stable and high-speed internet connection, especially for streaming services.
2. Close Apps: Close other running applications to free up network bandwidth and audio processing resources.
3. Switch Output Devices: Test music playback on different audio devices (e.g., headphones, speakers) to eliminate device-related issues.
1. Update App: Verify you have the latest Apple Music version installed.
2. Check Compatibility: Note that Crossfade may not be supported on all devices or OS versions.
3. Reinstall App: Uninstall and reinstall Apple Music to resolve any software issues.
1. Reorder Playlist: Adjust the playlist order to separate songs with significant volume differences.
2. Curate Playlists: Carefully select songs with similar intensity in a flow for seamless crossfading.
3. Edit Volume Labels: Check and adjust song volume labels for consistency.
Increase crossfade duration for smoother transitions between songs.
This is typically a song metadata issue. Try deleting and re-adding the tracks to resolve the issue.
By following these troubleshooting steps, you can resolve most Crossfade issues in Apple Music and ensure a smooth listening experience. However, if the Apple Music Crossfade feature is malfunction anyway, you can try other methods to enhance your listening experience. We'll share some of the best alternatives in the next section.
While Apple Music's Crossfade feature already provides users with a seamless music playback experience, sometimes we might want to further enhance sound quality, discover more new music, or enjoy more personalized recommendations. At such times, exploring some alternative options or additional tools becomes particularly important.
All programs have their off moments. When Apple Music isn't functioning properly or the Crossfade feature doesn't meet your expectations, you might consider other software options.
However, the limitations imposed by Apple Music prevent you from doing any music transfer. Only relying on lateral thinking can effectively save us.
To geared to Apple Music users' needs, TuneCable Apple Music Converter has a clear advantage over downloading Apple Music tunes, albums, playlists, podcasts, audiobooks, and other audio files to a local PC or Mac in undecrypted MP3, AAC, WAV, FLAC, AIFF, and ALAC formats.
You can slack off after the conversion since you are enabled to import the downloaded Apple Music files to any apps, such as DJ software, video editors, VLC Media Player, foobar2000, Spotify, Tidal, and YouTube Music, across various devices unlimitedly.
Key Features of TuneCable Apple Music Converter:

Step 1 Initiate TuneCable Apple Music Converter
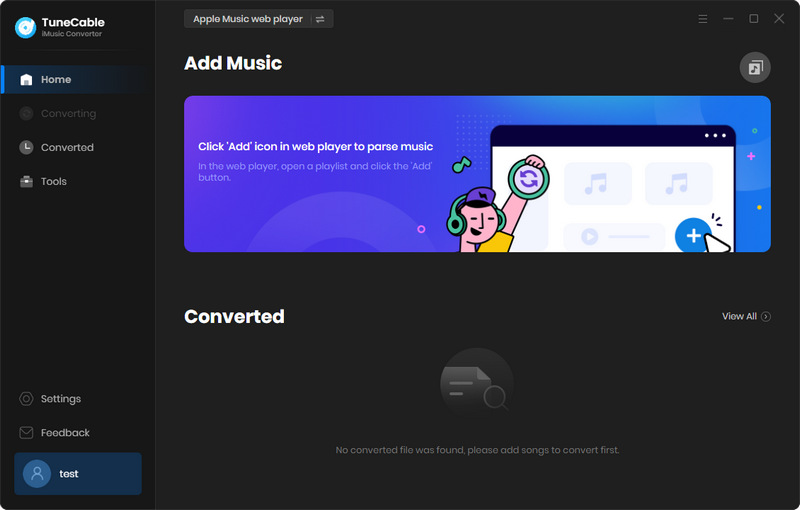
Start TuneCable Apple Music Converter after its installation. You have options of download source, the Apple Music(iTunes) app or the Apple web player. Pick a proper way and stick to it.
Step 2 Locate Your Desired Apple Songs, Albums, Playlists
As mentioned in the previous step, two modes are provided for downloading music, which involves slight differences in this step.
If you choose to record music from the app, click the "+Add" button in the "Home" section. After a brief moment, TuneCable will load your iTunes Library. Here, you will find your iTunes downloads, audiobooks, and Apple Music playlists. Select the tracks you need by checking the corresponding boxes, then click "OK" to add the selected songs to the download list.
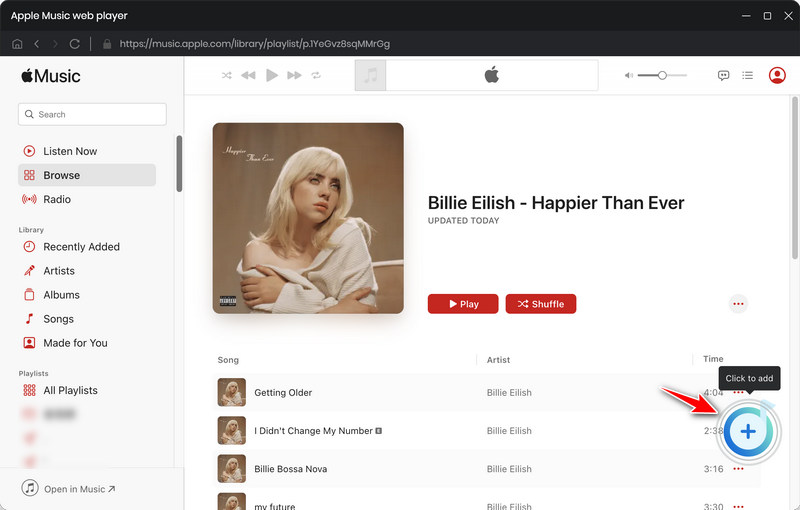
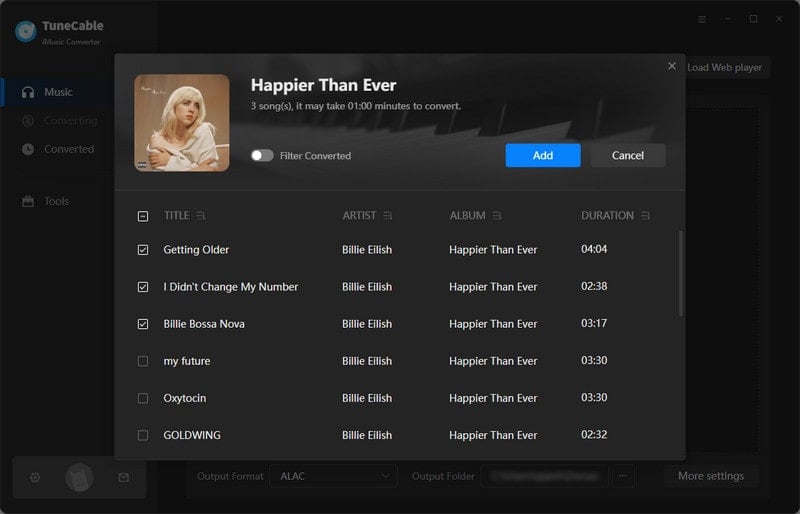
If you choose to record music from the web player, the built-in Apple Music web player page will appear. Log in to your Apple Music account. Open an album or playlist, then navigate to the lower right corner and click on the blue "+" button. TuneCable will generate a list of songs for you to select. Choose the desired music tracks by checking the corresponding boxes and clicking "Add".
Step 3 Customize the Output Preferences
Before starting the conversion, check the output settings. Click on the "Settings" icon in the top right corner, and navigate to each section to reveal additional options.
The output quality depends on the output format. To download lossless Apple Music tracks, you can modify it as follows:
Instead, you can select "Recommended" in the "Output Format" to extract Apple songs in their original quality and format.
To easily find your Apple songs post-conversion, organize them by playlist or album. Ultimately, the sorting method is up to you.

Step 4 Download Apple Songs to Local PC
These changes will take effect immediately. After configuring all the parameters, you can start the conversion process by clicking "Convert". If you click the "Add More" button, you are allowed to include additional songs in this task list.
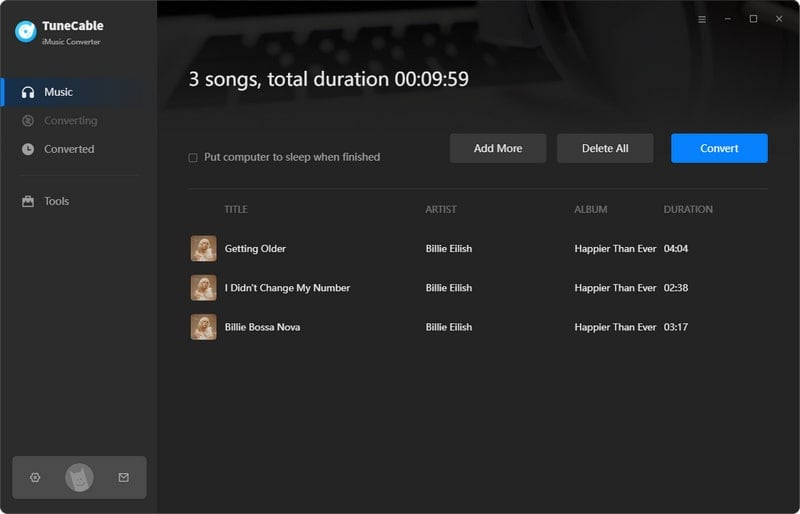
Step 5 Unlimited Playback of the Apple Songs
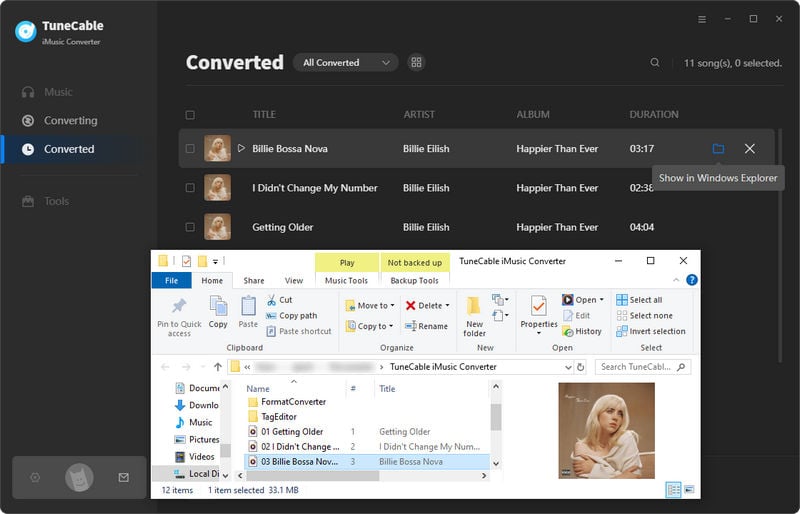
It won't disturb you while you're busy with other tasks. It runs silently in the background. When the conversion is complete, you'll receive a notification. The output folder will be displayed automatically. If it doesn't show up, go to the preset save location where you'll find all your converted files. Apple Music will be organized according to your specifications. You can add these downloaded Apple Music files to any app for an enhanced listening experience.
1. Spatial Audio: Take advantage of Spatial Audio with Dolby Atmos if your device supports it, for a more immersive sound.
2. Equalizer Settings: Customize the equalizer settings to adjust bass, treble, and other frequencies according to your taste.
3. Smart Playlists: Create smart playlists based on criteria like genre, artist, or recently played songs.
4. High-Quality Equipment: Get high-quality headphones and audio equipment for a more stunning and realistic sound experience.
5. Music Mixing Software: For those who want more control over their music transitions, software like DJay Pro or Virtual DJ allows you to create custom mixes with precise control over crossfade and other effects.
6. Third-Party Music Apps: Apps like Spotify and Tidal offer robust crossfade options along with high-quality audio and curated playlists. Third-party players such as VLC Media Player and foobar2000 provide extensive sound adjustments and support for various audio formats, making them great alternatives for those seeking customization. You can download Apple Music playlists as local files by following the steps above and importing them into these players for an enhanced listening experience.
In the previous section, we mentioned a highly recommended alternative to enhance your Apple Music listening experience by using other professional media players. Below is a list of some common music software that you can easily download and install from the internet, and some tools may come pre-installed on your computer, making them safe and reliable. In Part 4, we have already downloaded Apple Music songs and playlists to your local device in a common format, so let's boldly try out these options.
Add Apple Songs to Spotify
Step 1: Within Spotify, click on your account name positioned in the top left corner, and subsequently tap on the "Settings" option.
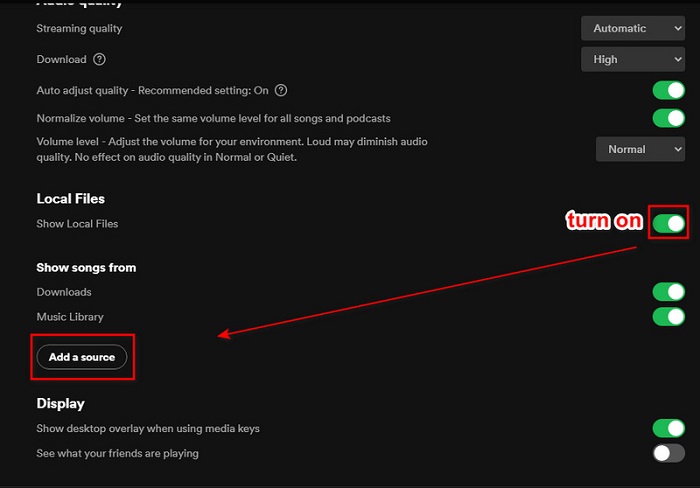
Step 2: Scroll downwards to locate and activate the "Local Files" feature.
Step 3: Press the "Add a source" button.
Step 4: Browse to the desired music folder, select it, and click "OK" to integrate it into Spotify.
Step 5: Navigate to "Your Library" from the left-side menu, and you'll notice a fresh "Local Files" section. Herein, you can access the local Apple songs that reside in the music folder you've added.
Crossfade Apple Music on Spotify
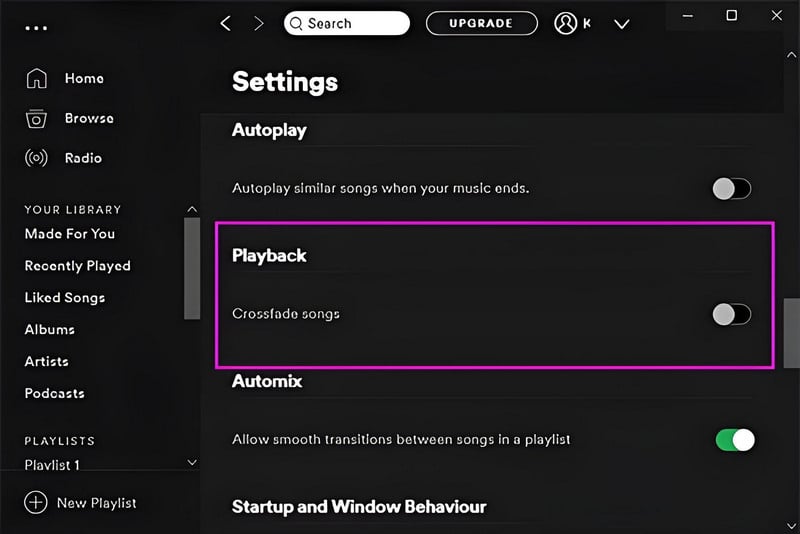
Step 1: Launch the Spotify app and head to the "Settings" section.
Step 2: Scroll down to the "Playback" area, toggle on "Crossfade songs" and adjust the slider to customize the duration of the crossfade effect.
![]() Further Suggestion: Everything About Spotify Equalizer >>
Further Suggestion: Everything About Spotify Equalizer >>
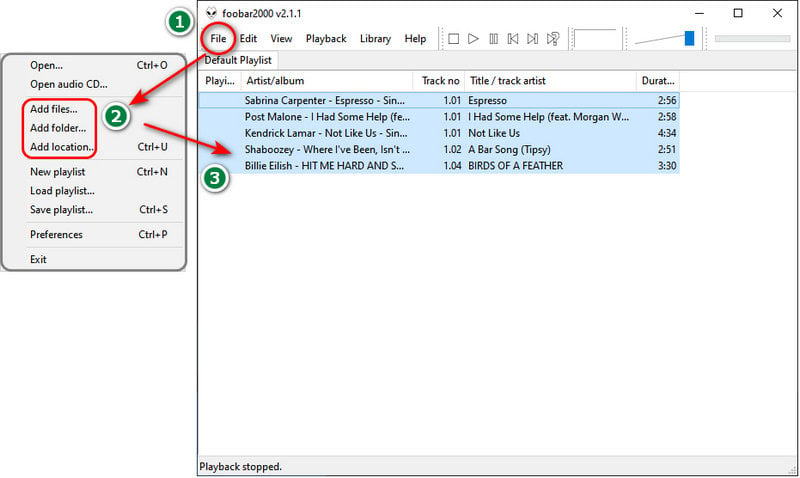
Add Apple Songs to foobar2000
Step 1: Go to "File" and choose between "Add files... / Add folder / Add location".
Step 2: Locate Apple Music tracks and add them to it.
Step 3: Enjoy the free playback of Apple songs on foobar2000.
Crossfade Apple Music on foobar2000
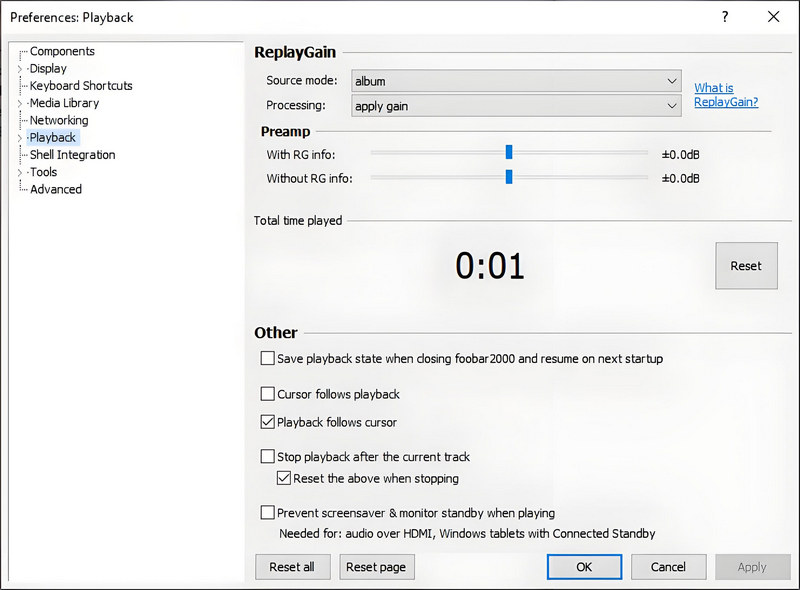
Step 1: Go to "File > Preferences >Playback" to adjust the playback settings according to your needs.
Step 2: If you've installed related components, you can enable the crossfade feature by ticking off "Fade on seek".
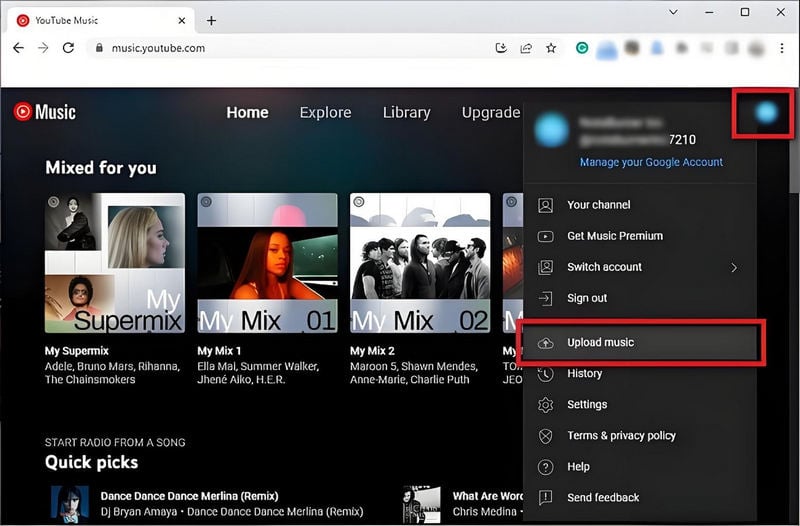
Step 1: Navigate to music.youtube.com and sign in to your YouTube Music account.
Step 2: Simply drag and drop your local Apple Music files (MP3, M4A, OGG, FLAC, or WMA) into any accessible area of the YouTube Music web player. Alternatively, you can select your profile icon, followed by "Upload music" to add music to your YouTube Music library.
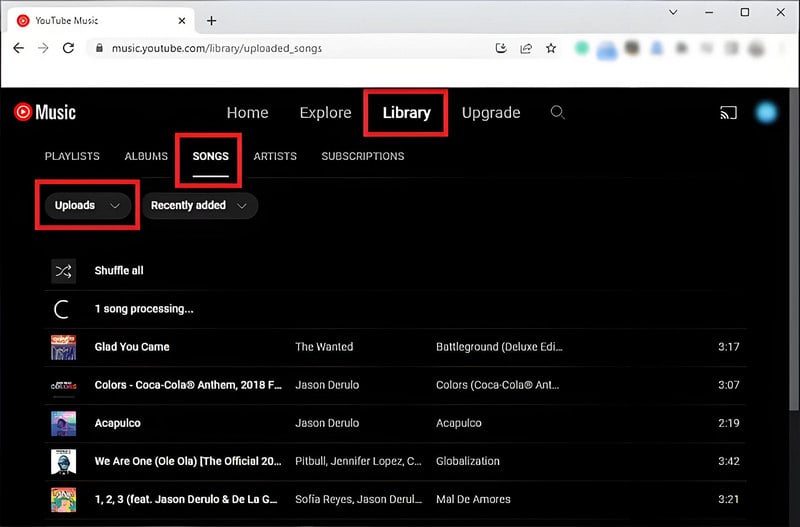
Step 3: To locate all your uploaded Apple songs on YouTube Music, proceed to "Library", select "SONGS", and then filter your view to "Uploads".
Step 4: Access the "Settings" section in YouTube Music. YouTube Music may not have a built-in crossfade feature. However, you can still adjust other playback settings such as: Repeat, Shuffle, Background Play, etc.
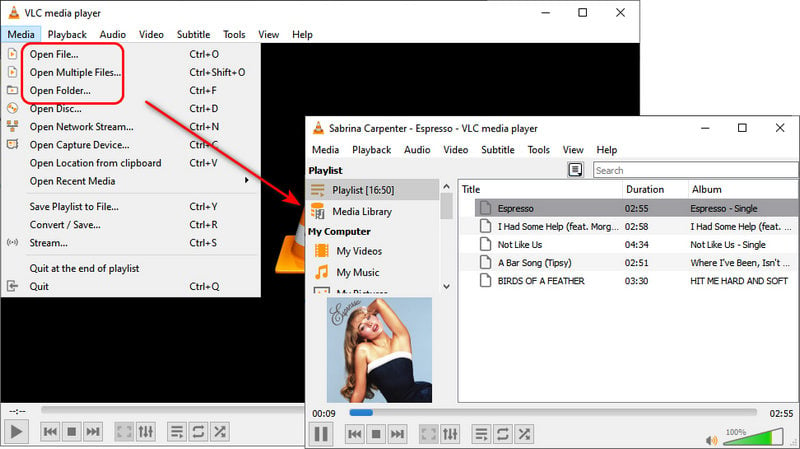
Step 1: Access the "Files" button in the menu bar of VLC Media Player.
Step 2: Select an option in the pull-down menu to add file(s) or a folder to VLC Media Player.
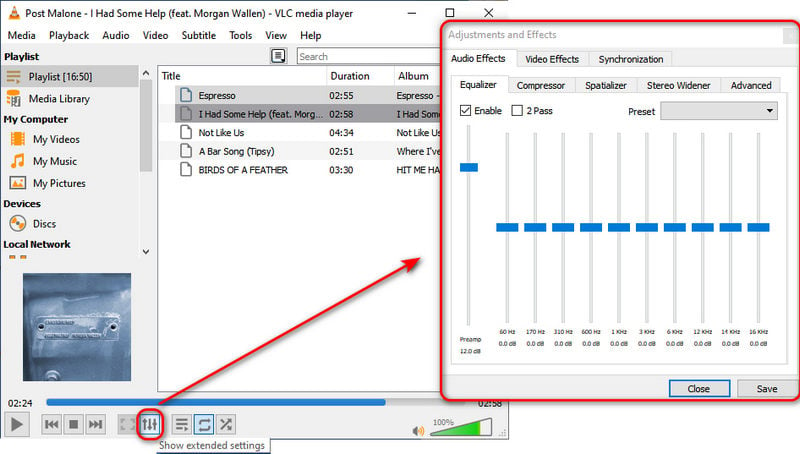
Step 3: You can click the "Show extended settings" button ![]() at the bottom to adjust the "Audio Effects" settings, including Equlizer, Compressor, Spatializer, Stereo Widener, and Advanced.
at the bottom to adjust the "Audio Effects" settings, including Equlizer, Compressor, Spatializer, Stereo Widener, and Advanced.
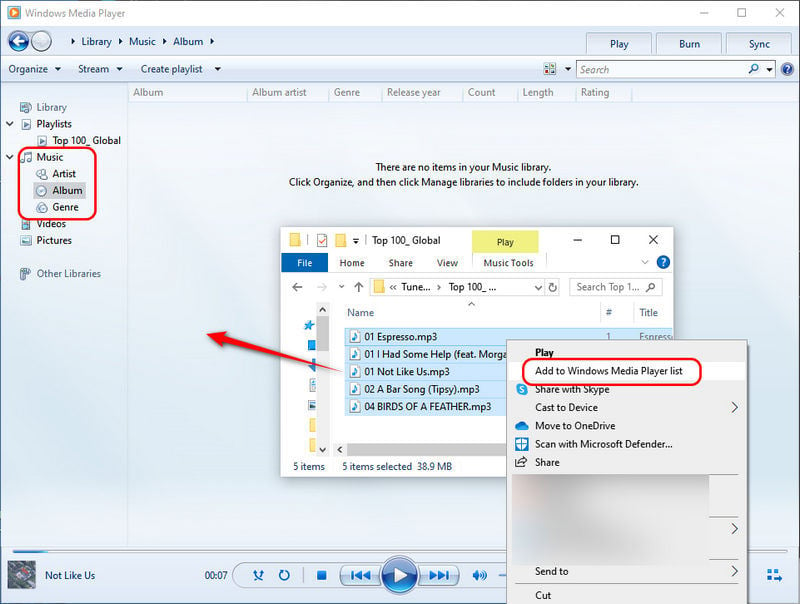
Step 1: Create a new playlist in Windows Media Player under the "Playlist" section.
Step 2: In the "Music" section, choose a label: Artist, Album, or Genre.
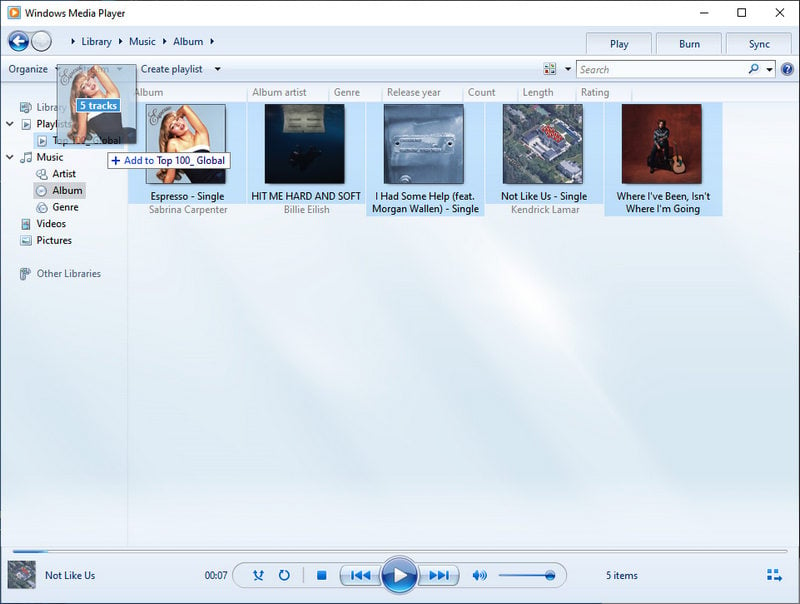
Step 3: Drag the downloaded Apple Music files to it. Other than that, you can right-click the selected songs and choose "Add to Windows Media Player list" in the pop-up menu.
Step 4: Select all Apple songs and put them into the newly created playlist. Finally, adjust the playback settings according to your needs.
We shared extra tips and tricks to further enhance your Apple Music listening experience, ensuring that you get the most out of your subscription. Whether you're a casual listener or an audiophile, these insights will undoubtedly enrich your interaction with Apple Music.
If you are seeking the best alternatives, the TuneCable Apple Music Converter is a must-have that removes all obstacles and enables unlimited playback of Apple Music integrated with a range of apps. Moreover, you can keep your lossless Apple songs forever! Come and try it out for yourself in your first-hand experience.
 What's next? Download TuneCable iMusic Converter now!