
TuneCable AI Audio Splitter
 >
How To >
Music Tips >
>
How To >
Music Tips >
Music enthusiasts and aspiring producers often seek ways to isolate vocals from songs for various creative purposes. Whether you're looking to remix a track, create karaoke versions, or simply study the vocal arrangement, removing vocals from a song can be a valuable skill. In this guide, we'll explore four efficient methods to remove vocals from any song for free. We'll cover using TuneCable AI Optimize, online audio splitters, Audacity, and GarageBand – all accessible and beginner-friendly tools.
In the world of music production and audio editing, the ability to cleanly separate vocals from the instrumental track is a game-changer. TuneCable BeatOne enables you to download songs from popular streaming platforms and save them in various unencrypted formats, making it easy to transfer them to any device or software. It downloads high-quality music from all major platforms, including Spotify (Lossless FLAC), Apple Music (lossless ALAC), Tidal (HiRes), Amazon Music (HD/Ultra HD), and Deezer (HiFi). Besides, TuneCable BeatOne offers free tools such as AI Optimize (AI Audio Splitter), as well as free online playback and offline download options for podcasts and radio.
The built-in TuneCable AI Optimize (AI Audio Splitter) provides free options for extracting vocals and instrumentals with exceptional clarity, preserving the original sound quality and metadata such as album artwork, titles, artists, albums, and genres. With support for batch import of multiple audio files and the utilization of AI technology for quick and simple processing, this tool makes professional-grade separation accessible even to beginners.

TuneCable BeatOne
🔹 Download music from Spotify, Apple Music, YouTube Music, TIDAL, Amazon Music, LINE MUSIC, Deezer, Pandora, Audible, Dailymotion, Qobuz, YouTube, Vimeo, SoundCloud, etc.
🔹 Free to download and stream podcasts and radio from 100+ renowned sites.
🔹 Free radio channel for enjoying hundreds of radio shows online & offline.
🔹 Free AI Optimize tool ensures high-quality vocal and instrumental separation.
🔹 Convert music to MP3, AAC, WAV, FLAC, AIFF, and ALAC for permanent playback.
🔹 10x conversion speed & batch download multiple albums and playlists.
🔹 Export lossless audio files while retaining ID3 tags, cover art, and lyrics.
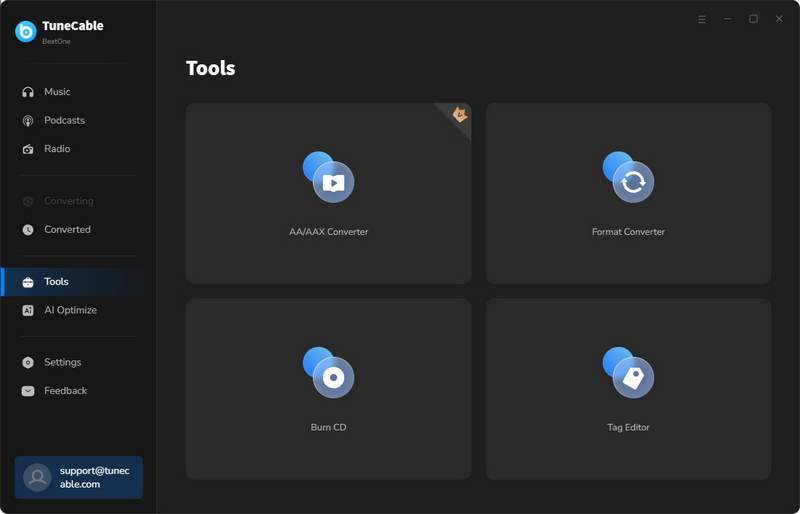
🔹 Other Tools: Export to iTunes, AA/AAX Converter, Format Converter, Burn CD, Tag Editor.
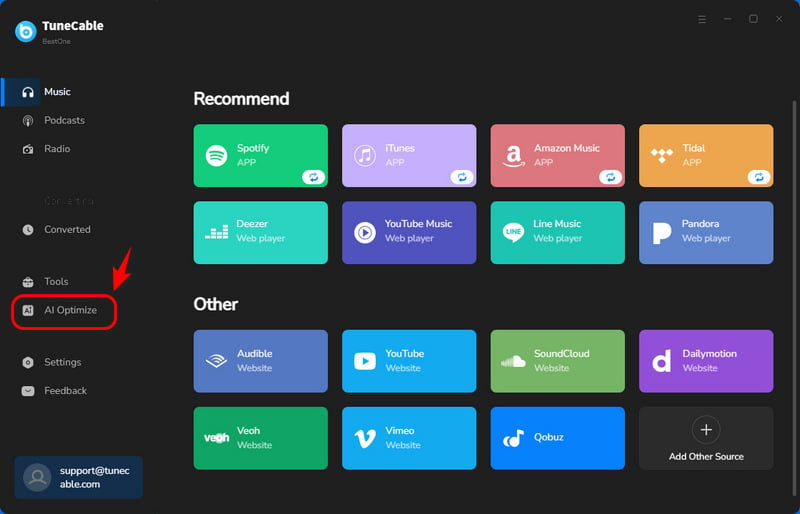
Step 1 Locate the AI Optimize Tool within TuneCable BeatOne
TuneCable BeatOne ensures a clean installation and works on both Windows PCs and Macs. Upon launching the main interface, various options to extract music from streaming platforms become available.
The tool to split vocals from any song is AI Optimize. On the left side, click on this tool to open the workspace.
Step 2 Set Up the Output Settings
On the main interface, there are basic settings you can change, such as the output format, quality, and output folder, enabling customized vocal separation results. You can set the output format in accordance with that of the original songs. When you switch the output format to WAV, AIFF, ALAC, or FLAC, the "Quality" option appears to be disabled, which indicates that TuneCable will split the vocals and background music and maintain the highest quality.
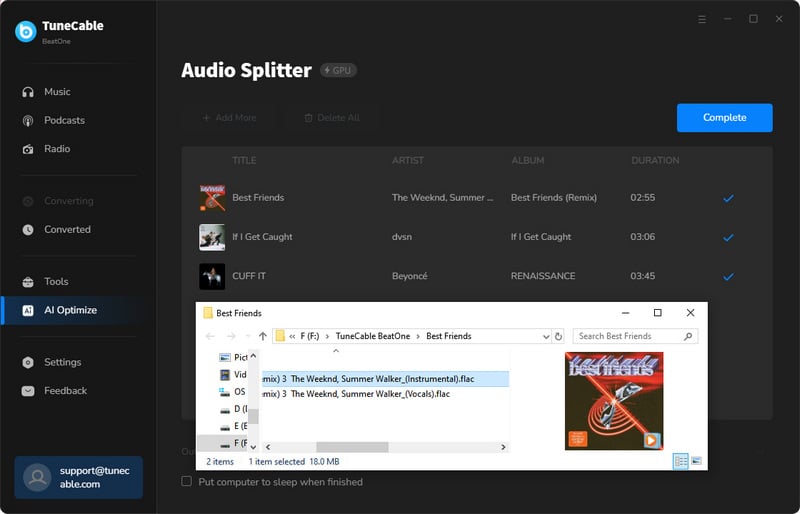
Step 3 Add Songs to AI Audio Split List
To add a song from which you plan to extract vocals to your task list, you can drag and drop the song directly from your local computer. Alternatively, importing songs through a click on the "+Add" button to create a vocal extraction queue.
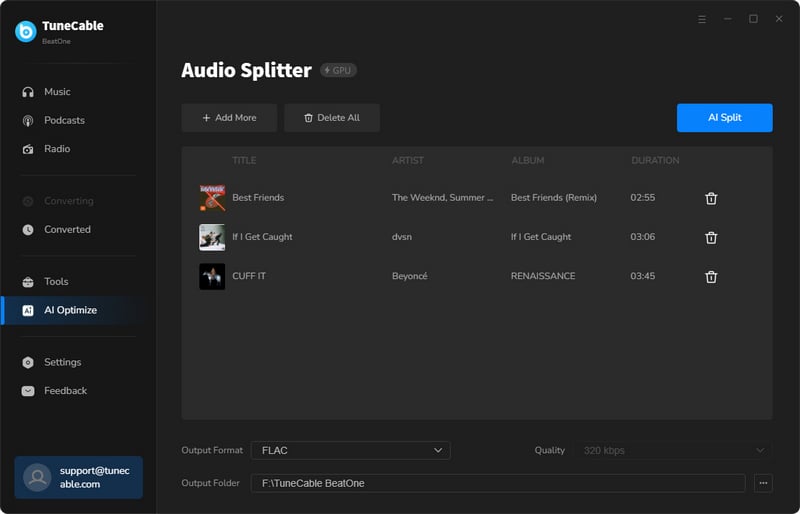
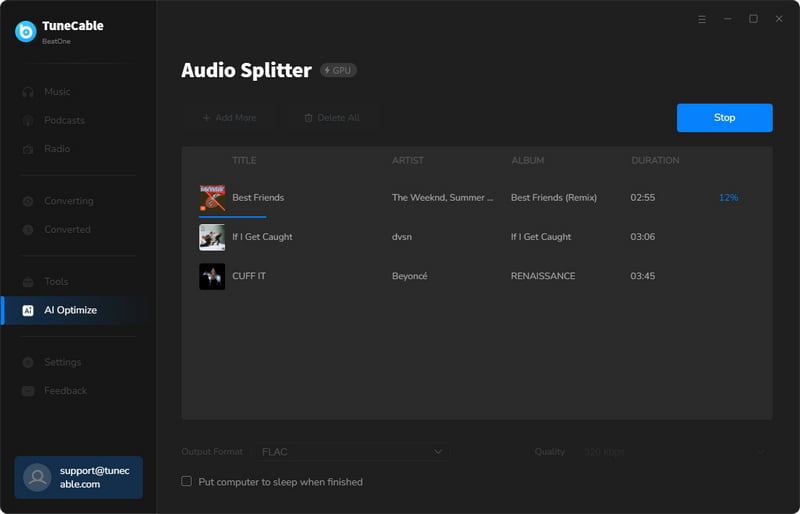
Step 4 AI Split Vocals and Instrumental
If you call a halt to adding more songs, click "AI Split" to separate vocals and instrumentals immediately.
Step 5 Unlimited Uses of Vocals and Instrumental
Removing vocals from any song will produce two audio tracks (Vocals and Instrumental) that you can access in the output folder on your local disk.
By successfully connecting your computer to your device using a USB cable, you can effortlessly upload vocals and background music to your Android phone, iPhone, MP3 player, or any other compatible device for remixing purposes. Additionally, you have the flexibility to insert your USB flash drive or SD card into your computer and copy these audio files to these portable storage devices without any limitations.
With the vocals and instrumental successfully separated, you can now compile these tracks onto a CD for easy playback on traditional audio systems. Open TuneCable BeatOne and simply navigate to "Tools > Burn CD". Next, drag and drop your vocals and instrumental tracks into the program. Finally, insert a blank CD and initiate the burning process to transfer these tracks onto the CD.
Launch a DJ app, like Virtual DJ, Serato DJ, Rekordbox DJ, Traktor DJ, among others. Afterward, import vocals and instrumentals directly into your chosen DJ software. Moreover, use the built-in local file explorer in your DJ app to access these vocals and instrumentals and commence your creative process. Whether staging a live set or crafting a mixtape, having clear vocals and instrumental tracks at hand unleashes a myriad of creative opportunities.
Choose an output format that is compatible with the editor before processing the vocal separation. Simply import the isolated vocals and instrumental tracks into your editor, and you're ready to start remixing, creating mashups, or adding custom effects. This gives you the flexibility to enhance your projects with precise control over each element, whether you're working on a music video, podcast, or any other creative endeavor.
Online audio splitters offer a quick and convenient way to remove vocals from songs without installing any software. These tools leverage advanced algorithms to separate vocals from the background music, making them ideal for casual users or those who prefer not to deal with complex software setups.
Step 1: Choose a Reliable Online Tool. Navigate to a reputable website offering a free vocal remover service. You can find the Top 14 Free Vocal Removers on this page.
Step 2: Upload Your Song. Find an upload button and click on it. Then select the song file from your device. Most online tools support MP3 and WAV formats.
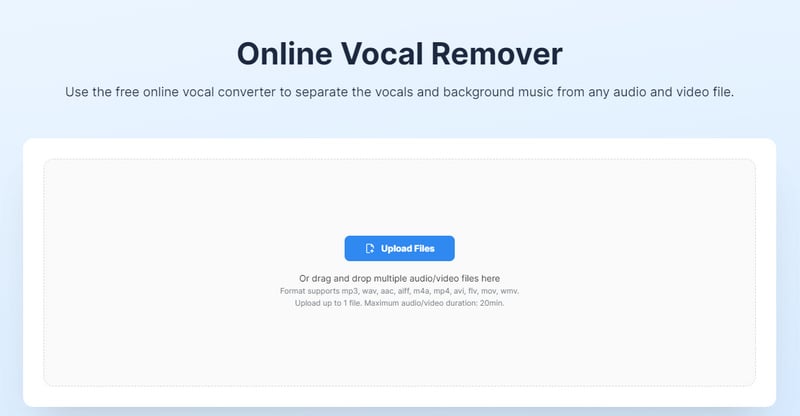
Step 3: Set the Output Parameters. Depending on the tool, you may be asked to choose between different removal modes, output formats, output quality, etc. Finish your settings and move on.
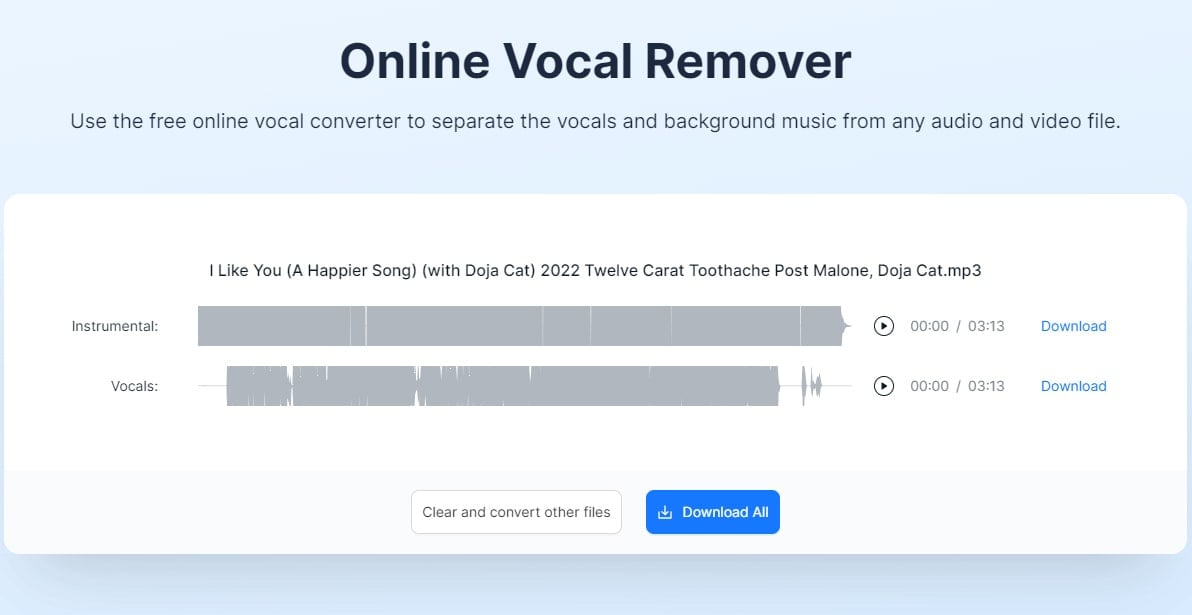
Step 4: Wait for Processing. The tool will then process your file, which can take a few seconds to a few minutes depending on the file size and server load.
Step 5: Download the Result. Once processing is complete, you will see two tracks for instrumental and vocals. Download the file with the vocals removed.
Audacity is a free and open-source audio editing software that provides a powerful set of tools for recording, editing, and mixing audio. It's particularly useful for those who prefer more control over the process. Let's explore how to use Audacity to remove vocals from a song.
This feature allows a user to separate a mono or stereo track into individual stems - Drums, Bass, Vocals, & Other instruments.
![]() Notes:
Notes:
1. This functionality is only available on Windows and Linux.
2. You need to get the latest version of Audacity from Audacity's official download center to access this function. Audacity is developed by a group of volunteers, and you may encounter a prompt stating "unable to update" when checking for updates within the application.
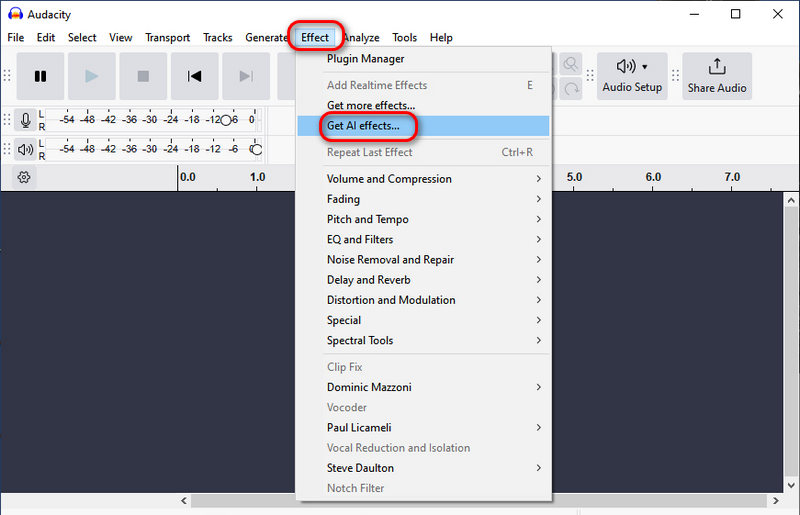
Step 1: To separate vocals from music, utilize the Intel OpenVINO Music Separation plugin. Begin by downloading the plugin. Get the plugin from this page directly. Instead, open your up-to-date Audacity and go to "Effect > Get AI Effects", you will be directed to the same page.
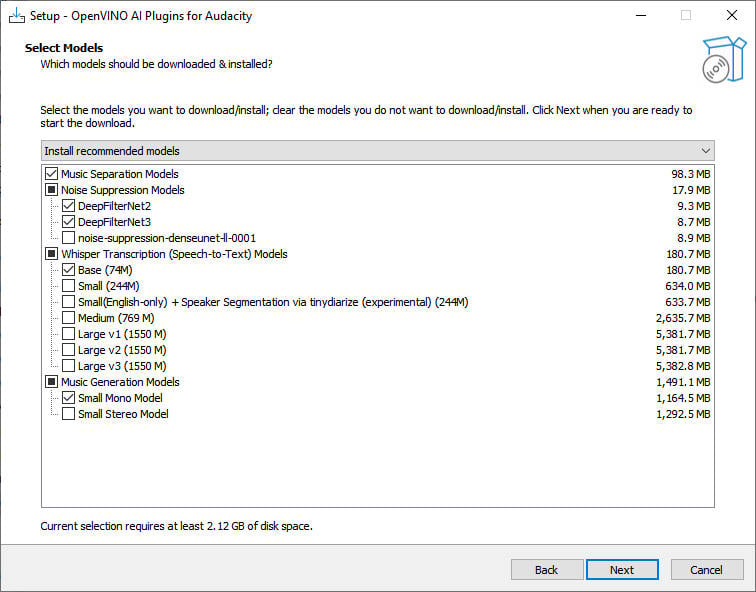
Installing the OpenVINO plugin can take a considerable amount of time (hours), so it's advisable to perform the installation during your free time and remain patient throughout the process.

Step 2: Follow the installation guide to set up the plugin. When prompted to "Select Modes" during the installation process, please exercise caution and do not skip this step. Instead, carefully select the effects and models that align with your requirements.
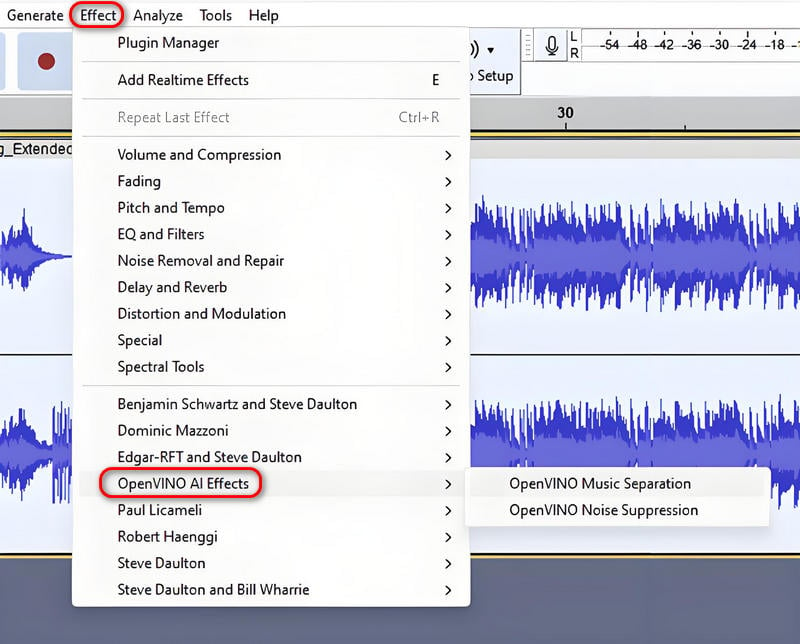
Step 3: After setup, upon restarting Audacity, the plugin can be accessed through "Effect -> OpenVINO AI Effects -> OpenVINO Music Separation".
![]() Can't See OpenVINO AI Effects?
Can't See OpenVINO AI Effects?
Step 4: On the pop-up setting window, select the appropriate separation mode. The "2 stem - Instrumental and Vocal" mode is effective for most tracks, whereas the "4 stem" option is beneficial for extracting specific instruments like drums and bass when present in a song.
The "Inference Device" preference enables you to designate which processor should handle the task:
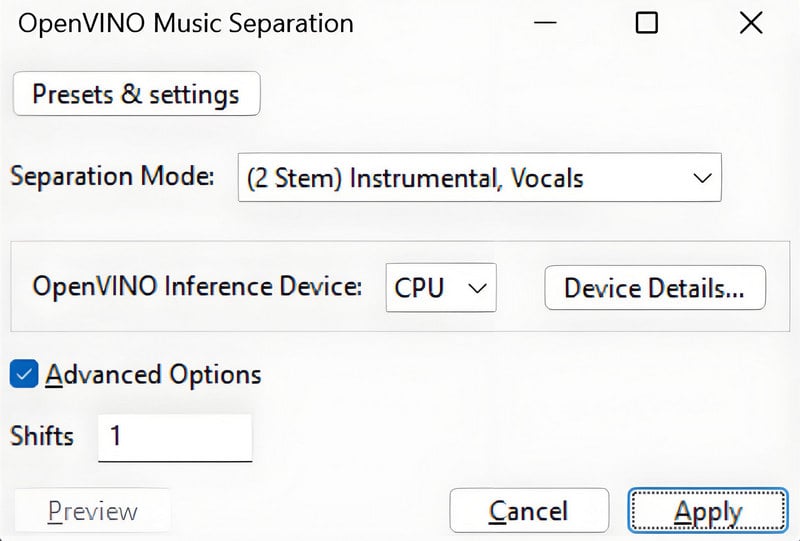
Step 5: After clicking "Apply", you'll see a dialog pop-up window that reads Loading Music Separation AI Model to CPU..."
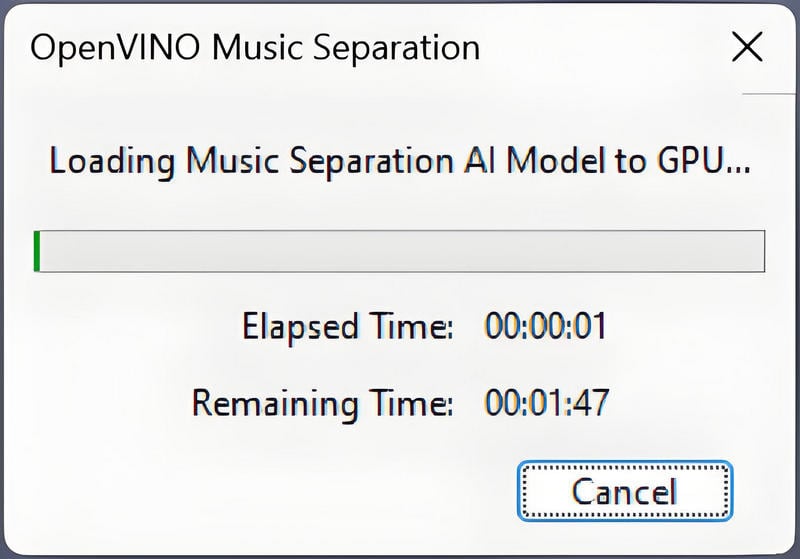
Step 6: At this juncture, the Music Separation AI model undergoes the process of being loaded onto the designated device (such as a CPU or GPU). Typically, this loading phase takes between 10 to 30 seconds if it's the initial run with this particular device subsequent to installing the respective plugins, as the model must be compiled specifically tailored to your chosen device. However, rest assured that this compiled model will be stored in the disk cache, significantly expediting its subsequent loading times.
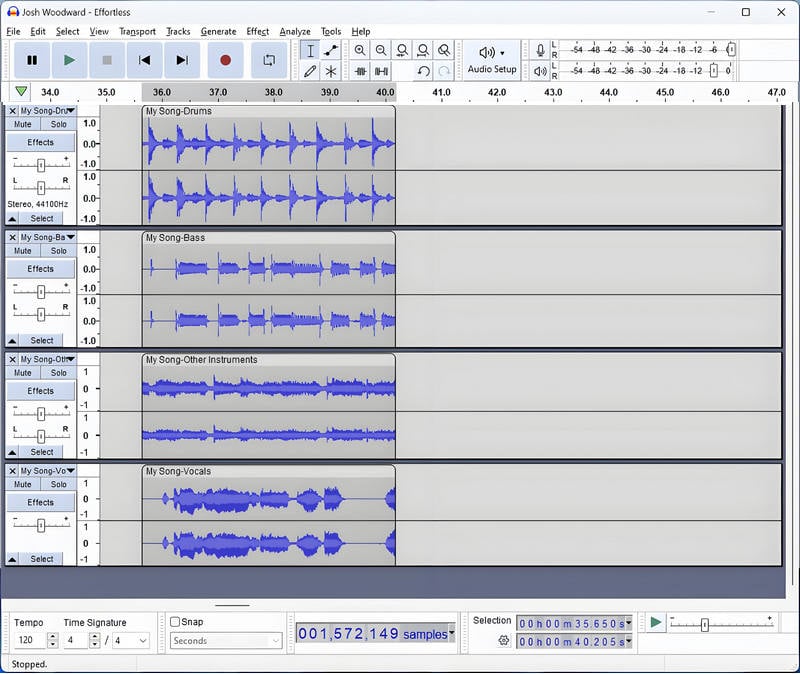
Upon completion, the Audacity workspace will reveal either 2 or 4 fresh tracks. Specifically, in the 4-Stem mode, the newly created tracks will exhibit a naming convention that includes suffixes like "-Drums", "-Bass", "-Vocals", and so forth, allowing for effortless differentiation among them.
An alternative, albeit often less dependable, approach to eliminating vocals involves leveraging their customary placement within the stereo image.
Step 1: From the drop-down menu associated with the stereo audio track, opt for "Split Stereo to Mono".
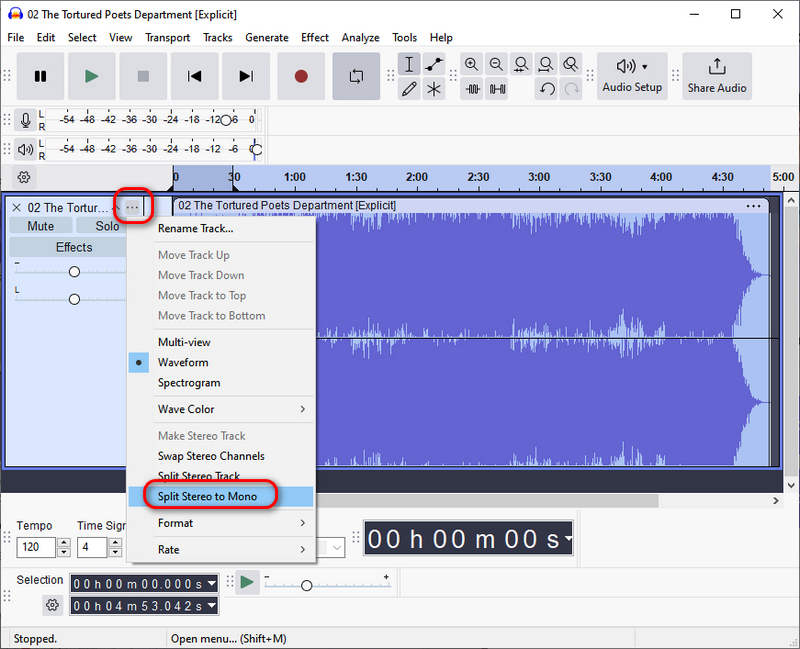
Step 2: Upon executing this split, you will be presented with two mono tracks that resemble the following:
Step 3: To cancel out one of these mono tracks, select it and choose "Effect > Invert".
Playing back the adjusted audio will result in the removal of any centrally panned elements, vocals inclusive, yielding a dual mono output where both channels mirror each other's audio. In certain musical compositions, this may inadvertently strip away instrumental components as well. The process of vocal removal frequently falls short of being comprehensive, leaving behind audible remnants, particularly in instances where there are harmony vocals or where reverb effects have been employed, as these enhance the dispersion of sound sources, complicating their segregation.
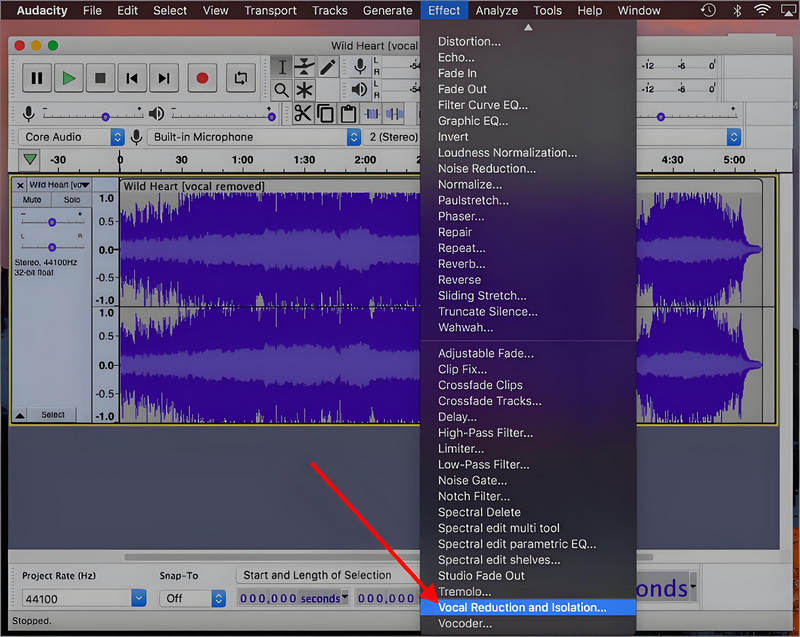
An alternative, albeit often less dependable, approach to eliminating vocals involves leveraging their customary placement within the stereo image.
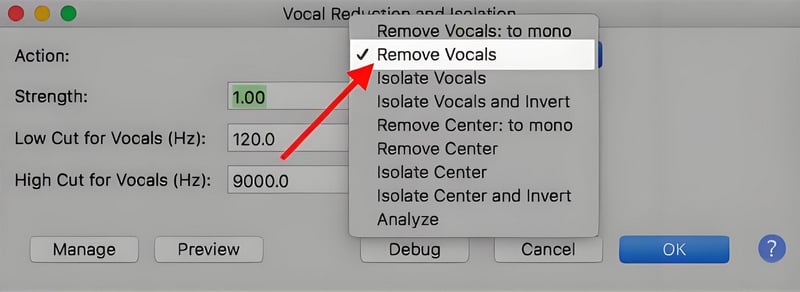
Step 1: Import the target song to Audacity, then select the desired track. Go to "Effects > Vocal Reduction and Isolation".
Step 2: Modify the vocal parameters by navigating through the settings and confirming with "OK". Subsequently, to amplify the track's volume, select "Effect > Amplify" and adjust the desired decibel (dB) level, finalizing with "OK".
Step 3: To export, head to "File > Export" and select your preferred format, among such as MP3, WAV, OGG, or others.
Step 4: To ensure future editing capabilities, save your work as a project file by navigating to "File" and clicking "Save Project". This will allow you to resume modifications at any time.
Apple's GarageBand, a free-to-use music production software, has been crafted for macOS, iPadOS, and iOS users. It endows users with the ability to compose, record, and refine their musical creations. For numerous music producers, GarageBand serves as a cost-effective alternative to pricey audio equipment and dedicated studios.
Before embarking on the journey of eliminating vocals in GarageBand, it's crucial to comprehend the concept of an isolated vocal track. Simply put, this refers to an audio file or recording that solely features vocals, devoid of any instrumental backing, harmonies, or background noises.
Removing vocals in GarageBand can be surprisingly straightforward. We'll look at three methods. Please follow and read.
If an isolated vocal track is at your disposal, eliminating vocals becomes a breeze. Follow these simple steps:
Step 1: Initiate the Project: Launch GarageBand on your Mac, create a fresh project, and import the song or audio file containing the vocals you wish to isolate.
Step 2: Silence the Vocals: Navigate to the track controls, positioned to the left of the waveform display. Click on the "Mute" button to silence the vocal track. If complete removal is desired, simply highlight the vocal track and press the "Delete" key.
In the absence of an isolated vocal track, EQ (Equalization) comes into play. Bear in mind, however, that this method may not yield a perfectly clean result, and traces of vocals, instruments, or reverberation might still be audible. Here's how to use EQ to minimize vocals:
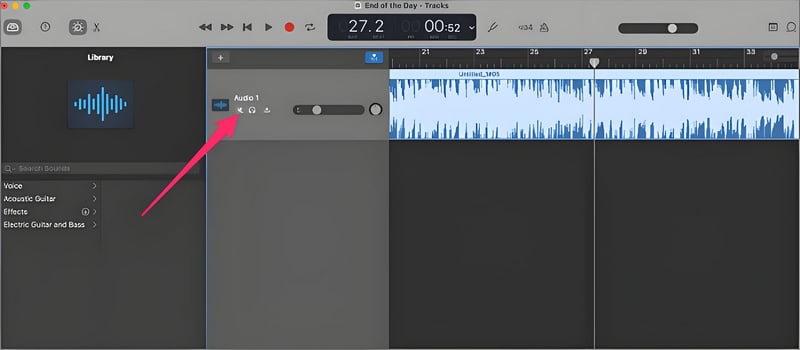
Step 1: Load Your File: Open GarageBand and import the audio file from which you intend to reduce vocals.
Step 2: Access Smart Controls: Locate the "Smart Controls" section on the left-hand side of the interface or click the corresponding button in the toolbar.
Step 3: Engage EQ: Within the Smart Controls area, select the "Track" button to access the EQ settings.
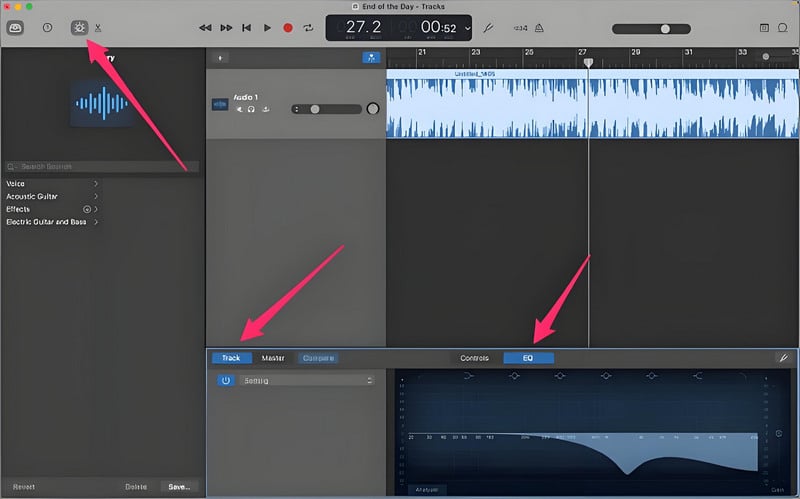
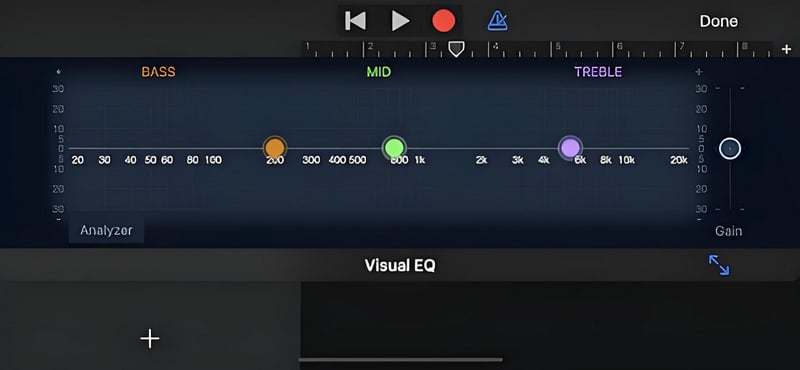
Step 4: Adjust EQ for Vocal Reduction: Upon activating the EQ, a visual representation of the frequency spectrum will appear, featuring sliders or knobs. These controls are utilized to eliminate the vocals.
Typically, vocal frequencies span from 80 Hz to 3.5 kHz (with lower-toned male voices around 80 Hz to 2 kHz and higher-pitched female voices approximately 100 Hz to 3.5 kHz). Targeting and reducing these frequencies on the EQ graph allows for the efficient removal of vocals from the audio mixture.
To separate vocals and instruments in GarageBand, follow these steps:
Step 1: Select Your Region: Identify the section you wish to split and click on it within the Track area.
Step 2: Position the Playhead: Move the playhead to the precise location within the selected region where you want the split to occur.
Step 3: Split the Region: Navigate to the top menu, select "Edit", and choose "Split Regions at Playhead" to complete the separation.
Removing vocals from a song can be achieved through various methods, each offering unique advantages. Whether you prefer the convenience of professional TuneCable AI Optimize tool, online tools, the flexibility of Audacity, or the simplicity of GarageBand, you can now confidently remove vocals from any song with lossless quality and clarity. Experiment with different approaches to find the one that best suits your needs and enjoy the creative possibilities that come with it.
If you want to separate vocals and instrumentals in one simple click, TuneCable BeatOne is the best answer. Having a free trial is the best way to prove everything. Let's get started!
 What's next? Download TuneCable BeatOne now!
Ava Morrison | Senior Writer
TuneCable BeatOne - All-in-one Music Solution

